If you’re searching for how to adjust the straps on a Joie 360 car seat, you’re already doing something right. Harness fit is not a small detail. It is the safety system. When the straps are properly adjusted, your child is protected, stable, and comfortable. When they aren’t, everything else becomes secondary.
The Joie 360 is designed to make life easier with its rotating base and streamlined harness system. But ease of use only matters if you know exactly what to adjust, when to adjust it, and how to confirm it’s correct. In this guide, I’ll walk you through how to adjust the straps on a Joie 360 car seat step by step — tightening, loosening, raising, lowering, and troubleshooting — so you can feel confident every single ride.
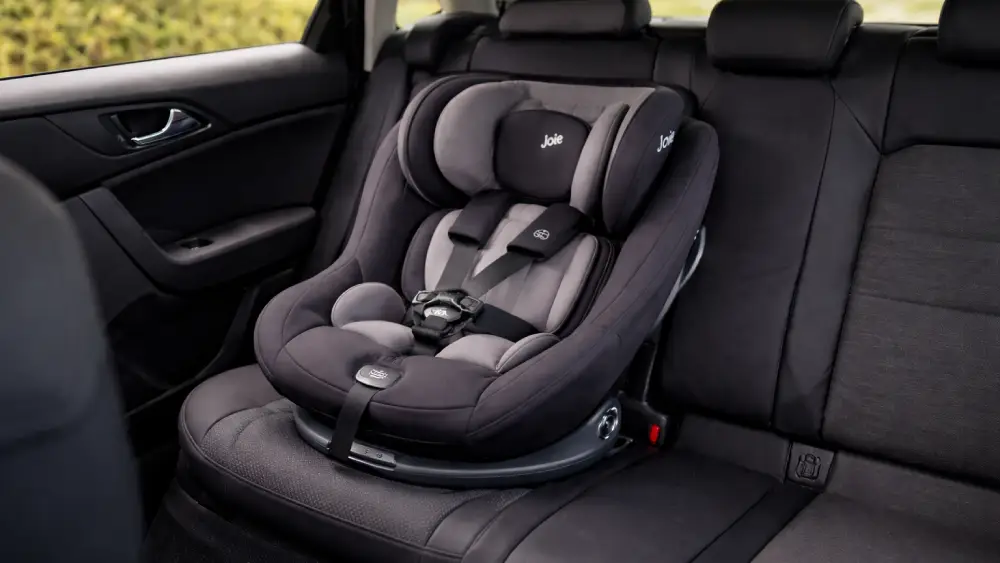
Understanding the Joie 360 Harness System
Before making adjustments, you need to understand what you’re handling. The Joie 360 uses a standard 5-point harness. That means five anchor points secure your child:
- Two shoulder straps
- Two hip straps
- One buckle between the legs
These straps meet at the chest clip and buckle, distributing force safely in the event of a collision.
Here are the components you’ll interact with most:
| Component | What It Does | Where to Find It |
| Harness release button | Loosens straps | Front of seat, under fabric flap |
| Adjuster strap (pull strap) | Tightens straps | Front center of seat |
| Shoulder straps | Secure upper body | Attached to headrest |
| Chest clip | Keeps straps aligned | Mid-chest area |
| Headrest adjustment lever | Raises/lowers harness height | Top or back of headrest |
One advantage of the Joie 360 is the rotating base. Turn the seat toward you before adjusting anything. It saves your back. It gives you visibility.
And precision matters.
When You Should Adjust the Straps
Strap adjustments aren’t a one-time task. They’re ongoing.
You should check and adjust the harness:
- After growth spurts
- When switching from summer to winter clothing
- After washing or removing seat fabric
- When switching between rear-facing and forward-facing
- If straps look uneven or twisted
Children grow fast. A strap height that worked three months ago may now sit too low or too high. Even small changes affect fit.
Here’s a simple rule: check the harness every month. It takes less than two minutes. It makes a measurable difference.
Safety Checks Before Adjusting
Before you begin adjusting the straps on a Joie 360 car seat, pause. Preparation prevents mistakes.
- Confirm the seat is properly installed (ISOFIX locked or seatbelt secured).
- Remove bulky coats or thick padding from your child.
- Rotate the seat toward you for easier access.
- Inspect straps for twists.
Twisted straps reduce surface contact and can concentrate force during impact. Run your fingers along the webbing. Smooth it out completely.
Clean lines. Flat straps. No folds.
Now you’re ready.
How to Loosen the Straps on a Joie 360 Car Seat
Loosening the harness is often the first step. You need slack to position your child comfortably before tightening.
Here’s exactly how to adjust the straps on a Joie 360 car seat when loosening:
- Rotate the seat toward you.
- Locate the harness release button at the front of the seat (usually under a small fabric flap).
- Press and hold the release button firmly.
- While holding the button, pull both shoulder straps forward evenly.
Do not pull from the chest clip. Pull directly from the shoulder straps.
If the straps won’t loosen:
- Make sure you are pressing the release button fully.
- Check for debris in the mechanism.
- Confirm the straps aren’t twisted at the back.
Sometimes resistance means the adjuster strap at the front is caught or angled incorrectly. Gently realign it and try again.
Simple. Controlled. No force required.
How to Tighten the Straps Properly
Now we secure the harness.
Place your child in the seat. Position their back flat against the backrest. No slouching. Hips all the way back.
Then:
- Place shoulder straps over both shoulders.
- Insert buckle tongues into the center buckle until you hear a click.
- Connect the chest clip.
- Pull the front adjuster strap downward and outward in one smooth motion.
The harness should be snug. Not restrictive. Not loose.
Use the pinch test:
- Try to pinch the harness strap at your child’s shoulder.
- If you can pinch excess webbing, it’s too loose.
- If your fingers slide off without grabbing fabric, it’s correctly tightened.
Chest clip positioning is critical. It should sit at armpit level — not stomach height, not near the neck.
Small adjustment. Big difference.
When people ask how to adjust the straps on a Joie 360 car seat, tightening is where mistakes usually happen. The most common issue? Leaving slack for comfort. A snug harness is comfortable when positioned correctly.
Adjusting the Harness Height
Height matters just as much as tightness.
The Joie 360 typically uses a no-rethread harness system, meaning when you raise or lower the headrest, the shoulder straps move with it. This simplifies the process dramatically.
Rear-Facing Strap Position
Straps should sit at or just below the shoulders.
Forward-Facing Strap Position
Straps should sit at or just above the shoulders.
To adjust height:
- Remove your child from the seat.
- Locate the headrest adjustment lever.
- Squeeze or lift the lever.
- Slide the headrest up or down.
- Release and ensure it locks into place.
Then place your child back in the seat and confirm strap alignment.
Here’s a quick visual reference:
| Seating Mode | Strap Position |
| Rear-facing | At or below shoulders |
| Forward-facing | At or above shoulders |
Incorrect height can allow forward movement in a crash. Correct height stabilizes the torso.
When learning how to adjust the straps on a Joie 360 car seat, this is the step that often gets skipped. Don’t skip it.
Adjusting for Rear-Facing vs. Forward-Facing Mode
The Joie 360 makes transitioning between modes simple. But harness positioning must adapt.
Rear-facing provides superior protection for young children. In this position:
- Keep straps at or slightly below shoulder level.
- Ensure the recline angle is correct for age and weight.
- Check headrest support is firm but not pushing the chin forward.
When switching to forward-facing:
- Move straps to just above shoulder height.
- Confirm the seat is locked firmly in forward position.
- Recheck installation stability.
After any mode switch, repeat the full harness adjustment process. Loosen. Position. Tighten. Pinch test. Confirm height.
Routine creates safety.
Common Mistakes to Avoid
Even experienced parents make small errors. Here are the most common ones I see when discussing how to adjust the straps on a Joie 360 car seat:
- Twisted harness straps
- Chest clip too low
- Harness too loose for winter clothing
- Uneven shoulder strap height
- Forgetting to recheck after washing covers
Twists are subtle but dangerous. Uneven strap height compromises distribution of force. A low chest clip can allow straps to slide off shoulders.
The fix? A 60-second visual inspection every time you buckle.
It becomes habit quickly.
Cleaning and Maintaining Harness Straps
Straps accumulate crumbs. Spills happen. But improper cleaning can weaken the webbing.
Follow these guidelines:
- Wipe straps with mild soap and damp cloth.
- Do not soak harness straps unless the manual explicitly permits it.
- Avoid bleach or harsh cleaners.
- Let straps air dry completely.
Inspect regularly for fraying, thinning, or stiffness. If you notice damage, contact Joie directly about replacement parts. Do not attempt DIY modifications.
A clean harness is good. An intact harness is essential.
Troubleshooting Strap Problems
Sometimes adjustments don’t go smoothly. Here’s how to diagnose common issues.
Straps Won’t Tighten
- Check that slack is pulled from hip area before tightening.
- Confirm adjuster strap isn’t twisted underneath.
- Ensure buckle tongues are fully clicked in.
Straps Won’t Loosen
- Press release button fully.
- Check for lodged debris.
- Inspect back of seat for caught webbing.
Uneven Strap Length
- Remove child.
- Pull both straps fully forward.
- Reset tension evenly before re-tightening.
When in doubt, consult the Joie 360 manual specific to your model version. Small mechanical differences can exist between production years.
Troubleshooting is part of mastering how to adjust the straps on a Joie 360 car seat. Once you’ve done it a few times, it becomes automatic.
Final Thoughts
Learning how to adjust the straps on a Joie 360 car seat is not complicated. But it demands attention. Small details determine real-world safety.
Loosen properly. Position carefully. Tighten firmly. Check height. Confirm chest clip placement. Repeat regularly.
The first few times may feel deliberate. That’s good. Deliberate builds confidence. Confidence builds consistency.
And consistency keeps your child protected — every drive, every mile.
If you’ve been unsure about how to adjust the straps on a Joie 360 car seat, now you have the exact framework. Use it. Practice it. Make it routine.
Because when the harness fits perfectly, everything else falls into place.
Frequently Asked Questions
Use the pinch test — if you can’t pinch excess strap at the shoulder, the harness is snug enough.
It’s located at the front of the seat, usually under a small fabric flap near the adjuster strap.
Check at least once a month and after growth spurts or clothing changes.
For rear-facing, straps should sit at or just below shoulder level.
Yes, you can fully adjust the harness without uninstalling the Joie 360.
Make sure you’re pressing the release button fully and pulling the shoulder straps forward at the same time.
Yes, thick clothing can create slack and make the harness unsafe in a crash.
Most Joie 360 models use a no-rethread system, so adjusting the headrest moves the harness automatically.
Remove your child and smooth the webbing flat before tightening the harness again.
Clean with mild soap and a damp cloth; avoid soaking unless the manual specifically allows it.