Let’s be honest: the first time you try to remove the Joie 360 car seat cover, it can feel like you’re solving a puzzle designed by someone who has never cleaned a car seat in their life. The crumbs are everywhere. The straps are in the way. The fabric seems tucked into places fabric shouldn’t even reach. And yet… you know the cover has to come off, because whatever happened in that seat is not going to magically disappear.
I’ve removed Joie 360 covers more times than I’d like to admit. Spilled milk. Crushed crackers. Sticky juice. One truly unforgettable carsick incident. And every time, the same lesson holds: removing the cover is easy once you know the order. The trick isn’t strength. It’s a sequence.
This guide walks you through how to remove Joie 360 car seat cover step-by-step in a way that’s clean, safe, and realistically doable at home—without yanking, guessing, or accidentally messing with parts that should never be touched.
Let’s get into it!
Before You Start: Set Yourself Up for an Easy Win
If you try to do this in a cramped car, you’ll hate your life.
Start by creating a small “work zone.” Nothing fancy. Just enough space to move around the seat without fighting it.
Here’s what I recommend grabbing before you begin:
- A large towel or blanket (to protect the floor and seat)
- Your phone (for quick photos—seriously, it helps)
- A small bowl or container (for pads, clips, and inserts)
Why this matters
When you’re learning how to remove Joie 360 car seat cover, most frustration comes from losing track of how things were attached. Photos solve that instantly.
Identify Your Joie 360 Model (Quickly)
Joie makes several rotating seats that people casually call “Joie 360,” including:
- Joie Spin 360
- Joie i-Spin 360
- Other region-specific versions
The good news? The cover removal process is extremely similar across them.
The differences are usually:
- how the headrest cover attaches
- whether there are extra tabs around the rotating base
- how the inserts are layered
So don’t worry if your seat doesn’t look identical to a photo online. The method still applies.
Step One: Remove the Seat From the Car
This is non-negotiable if you want to do it efficiently.
Removing the seat from the car gives you:
- better visibility
- better leverage
- access to hidden hooks
- less chance of missing debris
Place it on a flat surface. The floor is fine. A large table is even better.
Then rotate it so it’s facing you, like you’re about to buckle a child in. This is the easiest working position for how to remove Joie 360 car seat cover without fighting the straps.
Step Two: Loosen the Harness Straps All the Way
This step feels small. It is not small.
If you try removing the cover while the harness is tight, you’ll get stuck, and you’ll start pulling on fabric in ways that aren’t helpful.
Here’s what I do:
- Press the harness release button (usually near the front)
- Pull both shoulder straps forward gently
- Give yourself as much slack as possible
Why this matters
Slack straps allow you to slide the cover out from underneath them without forcing anything.
And in the world of how to remove Joie 360 car seat cover, forcing things is where mistakes happen.
Step Three: Remove Inserts, Cushions, and Accessories
Now the “peel back layers” phase begins.
Most Joie 360 seats include removable pieces like:
- Infant insert
- Head support cushion
- Lower body support
- Shoulder strap pads
- Buckle pad
Remove these first. Always.
Helpful tip
I stack them in the order I removed them. Top layer on top. Bottom layer on bottom. It makes reassembly smooth later.
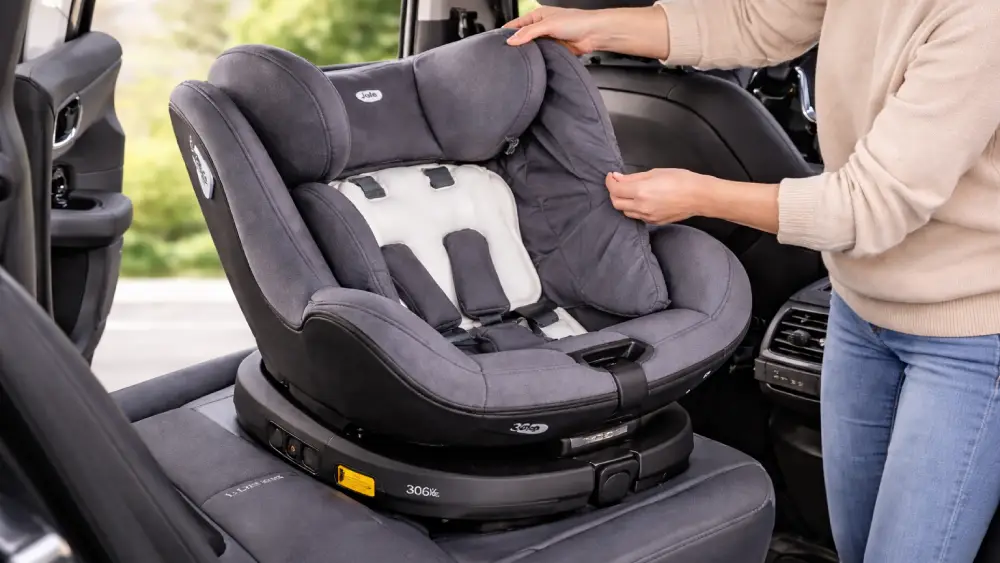
Step Four: Remove the Headrest Cover (This Is the Secret Move)
This is where many people get stuck. Not because it’s hard, but because it’s not obvious.
The headrest cover often holds part of the seat cover in place. If you skip it, you’ll keep tugging on the main cover and wondering why it won’t budge.
What to do
- Raise or adjust the headrest to a higher position (if your model allows it)
- Look underneath the headrest for:
- elastic loops
- tucked fabric channels
- Velcro strips
- Gently release those attachments
Then slide the headrest cover off slowly.
If it feels stuck
Stop and check again. There’s almost always one last loop still attached.
This step alone makes removing the Joie 360 car seat cover go from “annoying” to “manageable.”
Step Five: Free the Harness From the Cover Openings (Without Removing the Harness)
Let me say this clearly:
You are not removing the harness from the seat.
You are only moving it out of the cover’s way.
This is an important distinction.
What I do
- Slide the shoulder straps out through the fabric slots
- Move the chest clip and buckle tongues forward
- Remove strap pads if they’re still attached
- Keep everything untwisted
What to avoid
- Don’t unthread the harness from the back of the seat
- Don’t detach metal anchor plates
- Don’t pull straps through hardware
If you keep it simple, you’ll finish this step quickly.
Step Six: Detach the Main Seat Cover (Where the Hidden Hooks Live)
Now we’re at the heart of the process.
This is the step where most people go wrong—not because it’s complicated, but because Joie uses multiple attachment methods at once:
- elastic loops
- fabric tucked into grooves
- hidden tabs
- hooks underneath
So the key is to work in sections.
A) Start at the Bottom Front
I always start at the bottom front edge.
Why? Because it’s where the cover is most accessible, and it usually has elastic loops that are easy to unhook.
Look under the front lip of the seat and feel for elastic.
Then:
- unhook one side
- unhook the other side
- pull the cover slightly forward
B) Work Along the Sides
Next, move up the sides.
The fabric is often tucked into plastic grooves like it’s been “sealed” into the seat.
Use your fingers to pull it out gently. You don’t need tools. If you do use something, use something soft (like a plastic spoon edge). Avoid anything sharp.
What you’re looking for
- tucked fabric edges
- small fabric tabs
- hidden loops near the rotating base area
C) Move Up the Backrest
This part takes patience.
The backrest portion is often held in place by:
- more elastic loops
- fabric wrapped around the back
- tension from the harness slots
Work slowly and pull evenly.
If you pull hard in one direction, you risk tearing, stitching or stretching elastic.
D) Remove Around the Buckle Slot
This is where the cover can feel “stuck.”
The buckle strap passes through a slot in the fabric. To remove the cover, you need to guide the buckle through that opening.
Here’s how I do it safely:
- Pull the cover upward to expose the buckle slot
- Gently feed the buckle and strap through
- Avoid pulling the buckle strap itself
This is a detail that makes a huge difference when learning how to remove Joie 360 car seat cover.
E) Lift the Cover Off Completely
Once all loops and tabs are released, the cover should lift away.
If it doesn’t, don’t yank.
Instead, do a quick “perimeter check”:
- bottom front
- left side
- right side
- behind headrest
- around buckle slot
Almost always, you missed one elastic loop.
What NOT to Remove (This Saves People From Costly Mistakes)
Once the cover is off, you’ll see things that look removable. Some are. Some absolutely are not.
Do not remove:
- screws
- metal anchor plates
- internal foam pieces that appear structural
- the rotating base mechanism cover
- stitched strap components
If you see screws, stop.
If you see something that looks like part of the rotation system, stop.
A clean seat is not worth compromising safety.
Quick Cleaning Prep While the Cover Is Off
Now that the cover is removed, you’re staring at the real mess.
This is the moment to clean the seat shell properly before the cover goes back on.
Here’s what I recommend:
Quick cleanup checklist
- Vacuum crumbs and debris
- Wipe plastic with mild soap + warm water
- Clean crevices around the buckle area
- Check for any sticky residue
- Inspect for damage
This is also a good time to check:
- fraying straps
- cracked plastic
- damaged padding
If you’re maintaining seats professionally, this is the step that separates “cleaning” from “responsible care.”
Washing the Joie 360 Cover (Brief but Useful)
Once you’ve mastered how to remove Joie 360 car seat cover, washing it is the easy part.
Here’s the safe approach:
| Item | Recommended Cleaning Method |
| Seat cover | Cold wash, gentle cycle |
| Inserts | Cold wash or hand wash |
| Strap pads | Gentle wash |
| Harness straps | Wipe clean only |
| Buckle | Warm water rinse only (if needed) |
Washing rules I follow
- Use mild detergent
- Avoid bleach
- Avoid fabric softener
- Air dry only
Air drying matters. A lot. Heat can shrink the cover, and a shrunken cover is miserable to reinstall.
How to Put the Cover Back On (Without Losing Your Mind)
Reinstalling is just cover removal in reverse. But the order still matters.
Here’s the sequence I recommend:
- Fit the main cover over the backrest first
- Align side seams and tuck fabric edges into grooves
- Reattach elastic loops at the bottom front
- Feed the buckle through its slot
- Thread harness straps back through the correct openings
- Reinstall the headrest cover
- Add inserts and pads
Reinstall checklist (quick but essential)
- Straps are not twisted
- Chest clip is facing the right way
- Harness tightens smoothly
- Buckle clicks cleanly
- Cover sits flat and snug
- No bunching around the rotating base
If the harness feels weird after reassembly, stop and fix it. Don’t “hope it works out.”
Troubleshooting: Common Problems (And Real Fixes)
Even when you follow the steps, you may hit a snag.
Here are the most common issues I see when people attempt to remove Joie 360 car seat covers.
“The cover won’t come off.”
You likely missed:
- one elastic loop
- one tucked fabric edge
- a hidden tab near the side
Do a slow perimeter check.
“The straps keep getting stuck.”
You probably didn’t loosen the harness enough.
Go back. Loosen more. Then try again.
“The cover won’t fit back on.”
This is usually caused by:
- cover not fully dry
- cover installed crooked
- padding not seated correctly
Let it dry longer and reinstall slowly.
“The headrest cover won’t slide on.”
Adjust the headrest height, align seams, and check for a trapped elastic loop.
“My harness is twisted now.”
Untwist it before tightening.
Twists don’t fix themselves. They get worse.
Final Thoughts
Once you’ve done it once, how to remove Joie 360 car seat cover becomes one of those tasks that feels oddly empowering. The seat looks intimidating. It’s not. It’s just layered. And the layers have an order.
Start with inserts. Loosen the harness. Remove the headrest cover. Work from the bottom up. Release loops and tucked edges patiently. Then lift the cover away like you actually know what you’re doing—because now you do!
And when you reinstall everything clean, snug, and correctly routed, it’s a great feeling. A professional one. The kind of small win that makes parenting (or managing kid logistics) feel just a little more under control.
Frequently Asked Questions
Yes—most of the time, you only slide the straps through the fabric slots, not remove the harness from the seat.
Remove the seat from the car and loosen the harness straps fully before touching the cover.
You’ve likely missed a hidden elastic loop or a tucked fabric edge along the sides or backrest.
No—your hands are usually enough, and tools can damage fabric or plastic if you’re not careful.
Adjust the headrest upward and look underneath for elastic loops or Velcro holding the fabric in place.
Yes, in most cases you can wash it on a cold, gentle cycle using mild detergent.
No—air drying is best to prevent shrinkage and make reinstalling easier.
Wipe them with a damp cloth and mild soap if needed, but never soak or machine wash them.
Make sure it’s fully dry and aligned correctly, since damp fabric and mis-seated padding cause most fit issues.
Spot clean weekly and do a full cover wash every 1–3 months, or immediately after big spills.