If you’ve just bought a rotating car seat (or you’re about to), you’re probably thinking the same thing most parents think: This looks amazing… but how do I install it correctly? I get it. A 360° seat feels like a small engineering project the first time you touch it. The good news is that learning how to fit Joie 360 car seat properly is much easier than it looks—especially once you understand what each part is doing and what the safety indicators are actually telling you.
In this guide, I’ll walk you through the full process step by step. I’ll also show you what to check, what mistakes to avoid, and how to get the fit solid and secure without stress. Because once it’s installed right, the Joie 360 is genuinely one of the most convenient seats you can own!
Understanding the Joie 360 Car Seat (Before You Install It)
Before we jump into the fitting steps, it helps to understand what makes the Joie 360 different from a standard car seat.
Most traditional seats are either rear-facing or forward-facing and stay fixed in place. The Joie 360 is designed to rotate, letting you turn it toward the car door when you’re putting your child in or taking them out. That’s not just convenient—it can seriously save your back over time.
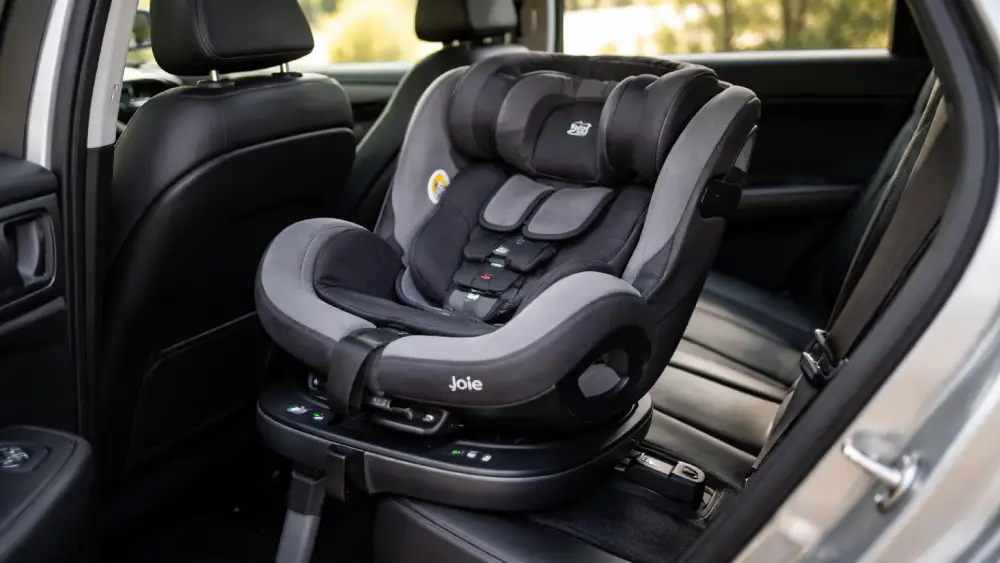
Here are the key parts you’ll be working with:
Key Features You’ll Use During Installation
- 360-degree rotation system (so the seat turns toward you)
- ISOFIX connectors (metal arms that click into your car’s ISOFIX anchors)
- Support leg / load leg (a leg that rests on the car floor for stability)
- Recline positions (different angles depending on rear-facing or forward-facing mode)
- Harness and headrest adjustment system
- Safety indicator windows (usually red/green)
Why Proper Installation Matters
This part isn’t meant to scare you, but it is important.
A rotating seat is safe only when it’s:
- properly locked into ISOFIX
- properly supported by the leg
If any of those aren’t correct, you may still be able to “use” the seat… but it won’t protect your child as well as it should.
So yes, learning how to fit Joie 360 car seat correctly is worth doing carefully the first time.
Before You Start: A Quick Preparation Checklist
This section will save you time and prevent the most common installation headaches.
1) Read Both Manuals (Really)
I know, I know. Manuals aren’t exciting. But car seat manuals are written for safety, not entertainment.
You’ll want:
- The Joie 360 manual (seat-specific steps and indicators)
- Your vehicle manual (ISOFIX locations, seat restrictions, airbag info)
2) Check Compatibility in Your Car
Most modern vehicles have ISOFIX points, but not every seat in the car is ISOFIX compatible.
Double-check:
- Which seats have ISOFIX anchors
- Whether your car seat position is approved for child seats
- Any special rules for front passenger seats (especially airbags)
3) Gather What You Need
You don’t need tools, but you do need a little space and patience.
Helpful setup items:
- Good lighting
- Enough room to kneel beside the seat
- A calm moment (not while your toddler is melting down!)
Step-by-Step: Installing Joie 360 with ISOFIX
Now we’re getting into the heart of it: how to fit Joie 360 car seat using ISOFIX.
This is the most common method and usually the easiest, because the connectors click into place and the seat tells you when it’s correct.
Step 1: Choose the Best Seating Position
The safest position in many cars is the rear middle seat—but it often doesn’t have ISOFIX.
So in real life, most people install the Joie 360 behind the driver or behind the passenger seat.
Good options (in most cars):
- Rear passenger-side seat (easiest for loading from the curb side)
- Rear driver-side seat (fine if that’s your preference)
Step 2: Place the Car Seat on the Vehicle Seat
Set the Joie 360 flat on the seat cushion.
Before you attach anything, check:
- The base is sitting flush
- Nothing is wedged underneath (blankets, toys, thick seat covers)
- The seat isn’t tilted sideways
A level base matters more than people think.
Step 3: Extend the ISOFIX Connectors
On the Joie 360 base, you’ll find a release button or lever to extend the ISOFIX arms.
Pull the ISOFIX connectors outward so they can reach the vehicle anchor points.
Tip from experience:
Extend them fully before you try to click them in. It makes alignment much easier.
Step 4: Align the ISOFIX Connectors with the Anchors
Your car’s ISOFIX anchors are usually hidden between the backrest and the seat cushion.
Sometimes they’re marked with a small ISOFIX label. Sometimes they’re not.
Slide the Joie 360 base back until the connectors line up with the anchors.
Step 5: Click the ISOFIX Connectors into Place
Push firmly until both sides click.
You should:
- hear a click
- feel the seat lock into place
- see the indicator turn from red to green
If one side clicks but the other doesn’t, don’t force it. Pull the seat forward slightly and try again.
Step 6: Push the Seat Back Tight Against the Vehicle Seat
Once the ISOFIX is connected, push the base back into the vehicle seat so it’s snug.
This reduces wobble and helps the load leg align properly.
Step 7: Extend the Support Leg (Load Leg)
The load leg is one of the most important safety components. It stabilizes the seat and reduces rotation in a crash.
Pull the support leg down until it reaches the floor.
Then extend it until it makes firm contact.
Most Joie seats use an indicator:
- Green = correct pressure and position
- Red = too short, too long, or not stable
Step 8: Confirm the Load Leg Is on a Safe Surface
Here’s a detail that gets overlooked:
Some vehicles have underfloor storage compartments in the rear footwell. If your load leg sits on top of a storage lid, it may not be safe.
If your car has this feature, check your vehicle manual. Some manufacturers require a filler block or restrict load leg use on that spot.
Step 9: Perform a Stability Check (“Inch Test”)
Now do the test that matters most.
Grab the seat base near the ISOFIX connection point and try to move it:
- side to side
- front to back
A properly installed seat should not move more than about an inch (2–3 cm).
It doesn’t need to be rock-solid like concrete, but it should feel secure.
A Quick Installation Checklist Table
This table is an easy way to confirm you’ve done the essentials.
| Installation Point | What You Want to See | Why It Matters |
| ISOFIX connectors | Both clicked in, both indicators green | Prevents detachment and shifting |
| Base position | Sitting flush on seat, no tilt | Keeps the seat stable |
| Support leg | Firm on floor, indicator green | Stabilizes seat during impact |
| Movement test | Less than 1 inch movement | Confirms secure attachment |
| Rotation lock | Locked for travel | Prevents unsafe rotation while driving |
If all five are correct, you’re in great shape.
Switching Between Rear-Facing and Forward-Facing Modes
One reason people search how to fit Joie 360 car seat is because they’re unsure how the seat changes modes.
The Joie 360 is designed to work rear-facing and forward-facing, but you should follow the weight and age guidelines in your seat’s manual.
Rear-Facing Mode
Rear-facing is recommended for as long as possible because it protects a child’s head, neck, and spine far better during a crash.
- Make sure the seat is in the correct recline position
- Ensure the rotation locks properly in the rear-facing travel position
- Confirm the harness height is correct (more on that below)
Forward-facing is typically used once your child reaches the minimum requirement for that mode.
- Double-check that the seat is locked into forward-facing travel position
- Ensure the top tether requirements (if applicable) are followed (some models vary)
- Confirm the recline is appropriate for forward-facing
How to Secure Your Child Correctly (This Matters as Much as Installation)
A perfectly installed seat can still be unsafe if the harness isn’t fitted correctly.
So yes—learning how to fit Joie 360 car seat includes learning how to fit your child inside it properly.
Adjusting the Harness Height
For most harnessed seats:
- Rear-facing: straps should come from at or slightly below the shoulders
- Forward-facing: straps should come from at or slightly above the shoulders
(Always follow the Joie manual for the exact rule for your model.)
Tightening the Harness: The Pinch Test
After buckling your child in:
- Pull the harness tightener strap
- Try to pinch the harness strap at the shoulder
If you can pinch excess webbing, it’s too loose.
A snug harness should feel secure but not uncomfortable.
Positioning the Chest Clip (If Your Model Uses One)
Some regions use chest clips, some don’t. If your seat includes one, it should sit at armpit level.
Adjusting the Headrest
The headrest should sit so your child’s head is supported, but not forced forward.
A good fit usually means:
- the headrest isn’t pushing the head down
- the harness sits flat and untwisted
- the shoulders align correctly
Rotating the Seat for Easy Entry
This is where the Joie 360 becomes a lifesaver.
Rotate the seat toward the door, buckle your child in comfortably, then rotate back into travel position.
Important:
Always confirm the seat locks in place before driving.
Common Installation Mistakes to Avoid
Most problems happen because something is almost correct—but not quite.
Here are the most common mistakes I see when people are learning how to fit Joie 360 car seat.
1) Ignoring the Indicator Windows
The seat is trying to help you!
If it’s showing red:
- ISOFIX isn’t locked
- load leg isn’t correctly positioned
- something isn’t secure
Never ignore a red indicator.
2) Load Leg Not Firmly on the Floor
Sometimes the load leg is touching the floor but not fully extended.
That can still trigger an unsafe position.
3) Seat Not Locked for Travel
A rotating seat must lock in the correct travel position.
If you can rotate it freely while driving, something is wrong.
4) Twisted Harness Straps
Twisted straps reduce the harness’s ability to distribute force properly.
It also makes it harder to tighten correctly.
5) Using Extra Padding That Didn’t Come With the Seat
It’s tempting to add soft inserts, head cushions, or aftermarket strap covers.
But unless it came with the seat, it can interfere with harness fit and safety.
Troubleshooting: If Something Doesn’t Feel Right
Even if you follow every step, you may hit one of these common issues.
Problem: ISOFIX Won’t Click In
Try this:
- Extend connectors fully
- Move the seat slightly forward, then back again
- Check if the ISOFIX anchors are buried deep (some cars are tight)
- Ensure the connectors are facing the correct direction
Problem: Seat Feels Loose
Try this:
- Push the base firmly into the vehicle seat after clicking ISOFIX in
- Confirm both ISOFIX indicators are green
- Re-check the movement test at the connection point, not at the top of the seat
Problem: Load Leg Won’t Reach the Floor
This can happen if:
- the seat is in the wrong recline mode
- the base isn’t positioned correctly
- your vehicle floor has an uneven shape
Reposition the base slightly and try again.
Problem: Indicator Stays Red
Red usually means:
- ISOFIX isn’t fully engaged
- load leg isn’t correct
- seat isn’t locked in travel position
Go through the checklist step-by-step again. It’s almost always one small detail.
Final Safety Checks Before You Drive
Before your first trip (and honestly, every now and then afterward), do these final checks.
Quick Safety Checklist
- ISOFIX indicators: green
- Load leg indicator: green
- Seat rotates smoothly but locks firmly in travel mod
- Base moves less than 1 inch at the connection point
- Harness is snug and untwisted
- Child is buckled correctly and comfortable
This is the part where you can take a breath and feel good about it. You’ve done the work!
Conclusion: Once It’s Installed, It Gets So Much Easier
The first time you learn how to fit Joie 360 car seat, it can feel like you’re wrestling with a high-tech piece of equipment. But once you understand the ISOFIX clicks, the indicator windows, and the load leg setup, it becomes a repeatable routine you can trust.
And honestly? That’s what you want. You want a seat you can install confidently, check quickly, and use safely every single day without second-guessing yourself.
If you take one thing from this guide, let it be this: don’t rush the install. A few extra minutes now can make a real difference later.
You’ve got this—and your back is going to thank you for choosing a rotating seat!
Frequently Asked Questions
Check that the ISOFIX and support leg indicators are green and the base moves less than 1 inch.
Most Joie 360 models are designed for ISOFIX installation, so always confirm your specific model’s requirements in the manual.
The support leg adds stability and helps reduce seat movement in a crash.
It usually means the ISOFIX connectors aren’t fully locked or the support leg isn’t correctly positioned.
Not completely—some movement is normal, but it shouldn’t move more than about an inch at the base.
It depends on your vehicle, but rear seats are safest and front-seat use may be restricted by airbags.
You’ll adjust the seat mode and lock it into the correct travel position, following the weight/age guidance in the manual.
Yes—always ensure it clicks into the travel position before driving.
It should be snug enough that you can’t pinch excess strap at the shoulder.
The most common issue is ignoring the indicator windows or forgetting to confirm the seat is locked for travel.