If you’re trying to figure out how to remove Chicco 360 car seat from base, you’re not alone. The first time can feel oddly intimidating. It looks seamless. Locked in. Almost permanent. But it isn’t. Once you understand the release mechanism and the correct positioning, the process is quick, controlled, and simple.
I’ve walked many parents through this. The common theme? They’re afraid of breaking something. Or they’re pulling in the wrong direction. Or they’re trying to detach it while it’s slightly rotated and not fully locked.
Let’s fix that.
This guide gives you exact steps, what to avoid, and how to troubleshoot if it won’t budge. No fluff. Just a practical direction you can follow immediately.
Before You Start
Good news: you don’t need tools.
That said, a couple small things help:
- A flashlight (helpful in low light)
- A stable stance outside the vehicle
- Both hands free
- The car parked on level ground
And one non-negotiable rule:
The seat must be empty before removal. Always.
Even slight weight in the seat can change pressure points and make the latch harder to release.
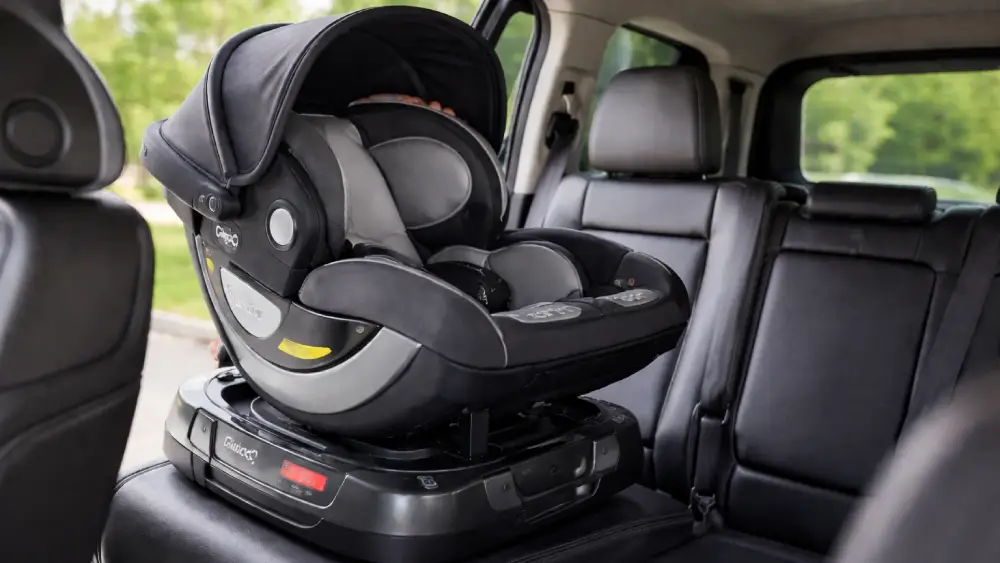
Understanding the Chicco 360 Setup
Before removing anything, it helps to know what you’re actually working with.
The Chicco Fit360 system consists of:
| Component | What It Does | What Stays in the Car |
| Car Seat (upper portion) | Holds the child and rotates | Removed as needed |
| Base | Anchors to vehicle using LATCH or seatbelt | Stays installed |
| Rotation mechanism | Allows 360-degree turning | Built into base |
The base stays secured to your vehicle. The seat detaches from the base using a built-in release mechanism.
The key point? The seat must be in a fully locked position before it can be removed.
Half-rotated equals half-locked. And half-locked will not release.
What Not to Do
Let’s save you some frustration.
Do not:
- Yank upward without pressing the release.
- Twist the seat aggressively.
- Attempt removal mid-rotation.
- Loosen the base installation thinking that’s the issue.
- Force it if it feels stuck.
If it doesn’t release, something is misaligned. There is always a mechanical reason.
Step-by-Step: How to Remove Chicco 360 Car Seat From Base
Here’s the exact process.
Step 1: Park and Open the Door Fully
Give yourself space. Stand outside the vehicle facing the seat. Keep your footing stable.
Small detail. Big difference.
Step 2: Confirm the Seat Is Empty
Remove your child first. Loosen the harness so straps don’t snag during lifting.
Never attempt removal with weight in the seat.
Step 3: Rotate to a Fully Locked Position
This is where many people go wrong.
Rotate the seat until you hear and feel a clear click. It should be either:
- Fully rear-facing locked
- Or fully side-facing locked (depending on model design)
If it moves slightly when you push it side to side, it’s not locked. Rotate again until it clicks.
No click? No removal.
Step 4: Locate the Release Handle
On most Chicco 360 models, the release handle is positioned at the back of the seat near the base connection point.
It may look like:
- A lever
- A recessed handle
- A red or gray release mechanism
Use your flashlight if needed. Don’t guess. Identify it visually.
Step 5: Press and Lift in One Motion
This is critical.
Place one hand firmly on the release handle. Press it fully. Not halfway. Fully.
With your other hand, grip the seat near the designated carry points or side shell. While keeping the release depressed, lift straight upward.
Not angled.
Not twisted.
Straight up.
If it doesn’t lift easily, apply slight downward pressure first, then lift while pressing the release.
That subtle downward push can relieve tension in the locking pins.
You should feel a smooth disengagement. No grinding. No snapping.
Step 6: Confirm It’s Detached
Once lifted, check the base visually.
Ensure:
- Both locking points are clear
- No plastic is misaligned
- The base remains stable in the vehicle
Congratulations. You now know how to remove Chicco 360 car seat from base properly.
And it gets easier every time.
If the Seat Won’t Come Off
Let’s troubleshoot logically.
1. It’s Not Fully Rotated
This is the most common issue.
Solution:
- Rotate firmly until you hear a solid click.
- Try both side-facing and rear-facing positions if needed.
2. You’re Not Pressing the Release Fully
The release handle often requires firm pressure.
Solution:
- Use the palm of your hand, not fingertips.
- Press fully before lifting.
3. Weight Is Causing Binding
Pressure from vehicle seat cushioning can create tension.
Solution:
- Push down gently on the seat.
- While holding downward pressure, press the release.
- Then lift.
That sequence matters.
4. Something Is Caught
Check for:
- Harness straps caught between base and shell
- Fabric bunching
- Foreign objects near latch points
- Debris buildup
A small crumb can create resistance.
5. Base Installation Is Overly Tight
Rare, but possible.
If the base is extremely compressed into the vehicle seat, pressure angles may increase friction.
If removal remains difficult:
- Remove and reinstall the base properly.
- Ensure it’s snug but not over-compressed.
Removing the Base (If That’s What You Meant)
Sometimes when people ask how to remove Chicco 360 car seat from base, they actually mean removing the entire base from the vehicle.
Here’s how.
If Installed with LATCH
- Locate the LATCH release buttons on each connector.
- Press and pull away from anchor points.
- Loosen the tension strap.
- Remove base from vehicle seat.
Never pry the connectors off without pressing release buttons.
If Installed with Seatbelt
- Open the lock-off panel.
- Unthread the seatbelt carefully.
- Release tension slowly.
- Remove base.
Keep the belt untwisted during removal.
If Your Model Has a Load Leg
Some Fit360 models include a load leg.
Before removing:
- Retract the load leg.
- Fold or reset it per manual instructions.
Do not attempt to remove the base while the load leg is extended.
Reattaching the Chicco 360 Seat to the Base
Removal is only half the process. Reattachment must be secure.
Here’s the correct sequence:
- Align the seat directly above the base.
- Lower straight down.
- Listen for an audible click.
- Apply a gentle upward pull test.
If it lifts, it’s not locked.
You should feel zero vertical movement when properly attached.
A quick tip: rotate slightly after attaching. If rotation feels smooth and clicks into positions firmly, the seat is correctly installed.
Maintenance Tips to Make Removal Easier
The cleaner the latch points, the smoother the release.
Follow this basic maintenance schedule:
| Task | Frequency |
| Inspect latch area | Monthly |
| Remove crumbs/debris | As needed |
| Wipe plastic contact points | Monthly |
| Check release handle function | Every reinstall |
Avoid:
- Lubricants
- Oils
- Silicone sprays
These attract dirt and can interfere with the locking system.
If the release ever feels sticky or inconsistent, inspect before forcing it.
When to Contact Support
If you experience any of the following, pause:
- Release handle feels loose or broken
- Seat will not lock back into base
- Audible grinding during rotation
- Base shifts after reinstalling
- Locking pins appear damaged
At that point, contact Chicco customer support or a certified Child Passenger Safety Technician (CPST).
Safety systems are not worth improvising.
A Clear Summary
Learning how to remove Chicco 360 car seat from base is about alignment and pressure. Rotate until fully locked. Press the release fully. Lift straight up. If resistance occurs, relieve tension before lifting.
That’s it.
The design is secure by intention. It’s meant to prevent accidental removal. Once you understand that the rotation lock and release handle must work together, the process becomes smooth.
And predictable.
Now you can remove it confidently. Reattach it correctly. Troubleshoot calmly.
No forcing. No guessing. Just controlled steps that work.
If you follow this guide, you’ll never struggle again with how to remove Chicco 360 car seat from base — and that peace of mind matters every time you load or unload your child.
Safe travels.
Frequently Asked Questions
Make sure it’s fully rotated into a locked position and you hear a clear click before pressing the release handle.
It’s usually not fully locked into position or the release handle isn’t being pressed completely.
Only if it’s fully locked in that side-facing position; mid-rotation will prevent release.
No, the seat detaches independently while the base remains secured in the vehicle.
Yes, slight resistance is normal, but it should release smoothly when the handle is fully pressed.
Check for debris around the latch points and apply firm, steady pressure rather than forcing it.
It’s possible, but using two hands ensures better control and a smoother lift.
You should hear a click and the seat should not lift when you gently pull upward.
Yes, slight downward pressure can relieve tension before lifting the seat off the base.
Inspect monthly for debris, proper locking, and smooth release function.