Installing a car seat shouldn’t feel like assembling furniture without instructions. Yet for many parents, that’s exactly how it feels. If you’ve chosen the Joie 360, you already care about safety and convenience—but knowing the Joie 360 car seat and how to install it properly is what actually protects your child. This guide walks you through the process clearly, calmly, and correctly, without fluff or scare tactics. I’ll show you what matters, what doesn’t, and how to feel confident once you’re done.
Let’s get into it.
Understanding the Joie 360 Car Seat
The Joie 360 is designed to simplify daily life while meeting strict safety standards. Its standout feature is the 360-degree rotation, allowing you to turn the seat toward the door when loading your child, then lock it securely for travel.
Before installing anything, it helps to understand what you’re working with.
Key basics
- Suitable from birth (with insert) up to approximately 4 years
- Supports rear-facing and forward-facing travel
- ISOFIX-based installation with a support leg
- Integrated rotation lock for travel positions
The Joie 360 must be installed using ISOFIX. There’s no seatbelt-only option, so compatibility with your vehicle is non-negotiable.
Before You Install: What to Do First
Rushing is the enemy of correct installation. Take five minutes to prepare and you’ll save yourself thirty minutes of frustration later.
Preparation checklist
- Park on level ground
- Choose a rear seat position with ISOFIX anchors
- Read both your car manual and the Joie manual
- Remove bulky seat protectors or mats
- Adjust the Joie 360 to rear-facing mode before installing
One quiet tip from experience: do your first install without your child nearby. Less pressure. Fewer distractions.
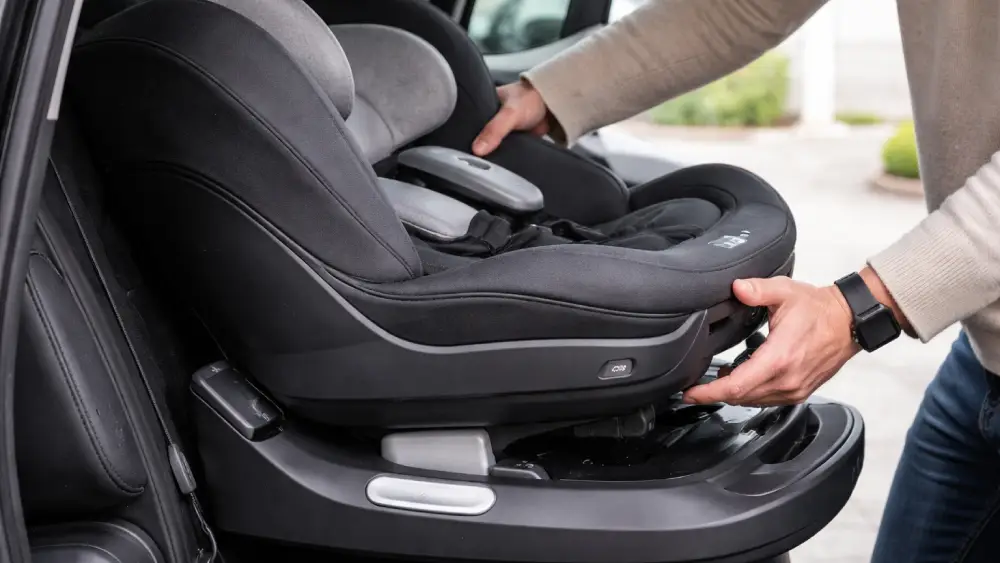
Joie 360 Car Seat: How to Install Using ISOFIX (Rear-Facing)
Rear-facing is the safest position for young children. Full stop. This is also the recommended starting position for the Joie 360.
Step-by-step installation
- Extend the ISOFIX arms
Pull the ISOFIX connectors out from the base until they’re fully extended. - Line up with your car’s ISOFIX points
These are usually between the seat cushion and seatback. Use the guides if your car provides them. - Click both ISOFIX connectors into place
You should hear a clear click on each side. Check the indicators—they should turn green. - Adjust the support leg
Drop the support leg down until it rests firmly on the vehicle floor. No gaps. The indicator should also turn green. - Push the seat back firmly
Apply pressure toward the back seat to ensure a tight fit.
That’s the core of the Joie 360 car seat and how to install it in rear-facing mode. Simple steps. Big impact.
Quick safety check
- Seat moves less than 1 inch side-to-side
- All indicators show green
- Support leg is straight and stable
If something feels off, it probably is. Recheck before moving on.
Installing the Joie 360 in Forward-Facing Mode
Forward-facing should only be used once your child meets the minimum age, height, and weight requirements. Many parents rush this step. Don’t.
When you’re ready, the installation changes slightly.
What’s different?
- The seat rotates to face forward
- The top tether becomes mandatory
- Recline settings may need adjustment
Forward-facing installation steps
- Keep ISOFIX connectors locked in place
- Rotate the seat to forward-facing and lock it
- Attach the top tether to your car’s anchor point
- Tighten the tether until snug—not overly tight
The support leg remains in use. This is non-negotiable.
Securing Your Child Correctly
A perfectly installed seat won’t help if the harness is wrong. This part matters just as much.
Harness best practices
- Shoulder straps at or below shoulders (rear-facing)
- Shoulder straps at or above shoulders (forward-facing)
- Chest clip at armpit level
- No slack—you shouldn’t pinch excess strap
Here’s a quick reference table:
| Item | Correct Position |
| Chest clip | Armpit level |
| Harness tightness | No pinching |
| Headrest | Just above shoulders |
| Clothing | Thin layers only |
Bulky coats are a common mistake. Use a blanket over the harness instead.
Using the 360-Degree Rotation Feature Safely
This feature is a lifesaver. It’s also where people make mistakes.
Rotate the seat only when the vehicle is stationary. Always lock it into a travel position before driving. The Joie 360 won’t let you lock into unsafe angles—but don’t rely on that alone.
Smart rotation habits
- Rotate toward the door for loading
- Lock rear-facing or forward-facing before driving
- Never drive with the seat sideways
The rotation is a convenience feature, not a travel position.
Safety Checks After Installation
Once installed, step back. Take a breath. Then check again.
Post-install checklist
- Pull firmly at the base near ISOFIX points
- Confirm all indicators are green
- Check the support leg position
- Ensure rotation lock is engaged
Repeat these checks after the first week. Seats can settle into cushions over time.
Common Installation Problems and Fixes
Even careful parents hit snags. Here’s how to solve the most common ones.
Problem: ISOFIX won’t click
- Push the seat deeper into the cushion
- Check alignment—don’t force it
- Clean debris from connectors
Problem: Seat feels loose
- Re-adjust ISOFIX arms
- Push down and back while locking
- Recheck support leg height
Most issues trace back to one thing: incomplete steps. Slow down and redo.
Maintenance and Reinstallation Tips
Life happens. You’ll remove the seat eventually.
Best practices
- Reinstall after deep cleaning
- Recheck installation after long trips
- Avoid secondhand bases unless verified safe
- Replace after any moderate or severe crash
If you move the seat between cars often, consider scheduling a professional check once. It’s worth the peace of mind.
Final Thoughts
Installing a car seat is one of those parenting tasks that feels intimidating—until it’s done right. Understanding Joie 360 car seat how to install gives you more than instructions. It gives you confidence.
You don’t need perfection. You need correct. Follow the steps. Check the indicators. Trust the process.
And then? Drive knowing you did it right.
Frequently Asked Questions
No, the Joie 360 requires ISOFIX connectors and a support leg for safe installation.
All safety indicators should turn green, and the seat should move less than one inch at the base.
Only once your child meets the minimum age, height, and weight requirements listed in the manual.
Yes, the support leg must rest firmly on the vehicle floor and show a green indicator.
No, the seat should only be rotated when the car is fully stopped.
This usually happens when alignment is off or the seat isn’t pushed far enough into the vehicle seat.
The harness should be snug enough that you cannot pinch excess strap material.
Yes, as long as each vehicle has compatible ISOFIX anchor points.
It’s not required, but it can be helpful if you want extra reassurance.
Yes, always recheck installation after removing or repositioning the seat.