If you’re trying to figure out how to take the Joie 360 car seat out, you’re probably standing in a parking lot right now, staring at it, wondering why it feels bolted to the chassis of your car. I’ve been there. The Joie 360 is secure by design—which is exactly what you want for safety—but that same stability can make removal feel intimidating the first time.
Good news: it’s straightforward once you understand how it’s installed. Whether yours uses ISOFIX or a seat belt system, the process follows a logical order. Get that order right, and the seat comes out cleanly. Get it wrong, and you’ll feel like it’s stuck forever.
Let’s walk through it step by step. Calmly. Precisely. Safely.
Identify Your Joie 360 Installation Type First
Before you do anything, confirm how the seat is installed. This is the most important step in learning how to take the Joie 360 car seat out correctly.
The Joie 360 (including models like Spin 360 and i-Spin 360) is typically installed in one of two ways:
| Installation Type | How to Identify It | What You’ll See |
| ISOFIX | Attached directly to built-in car anchor points | Metal connectors extending from base + support leg |
| Seat Belt | Secured using the vehicle’s seat belt | Belt routed through belt path with locking clip |
Quick visual check:
- If there’s a support leg touching the car floor → It’s almost certainly ISOFIX.
- If the seat belt runs through the base → It’s seat belt installed.
- If you see green/red indicator windows near the base → ISOFIX system.
Do not skip this step. Removal depends entirely on the installation method.
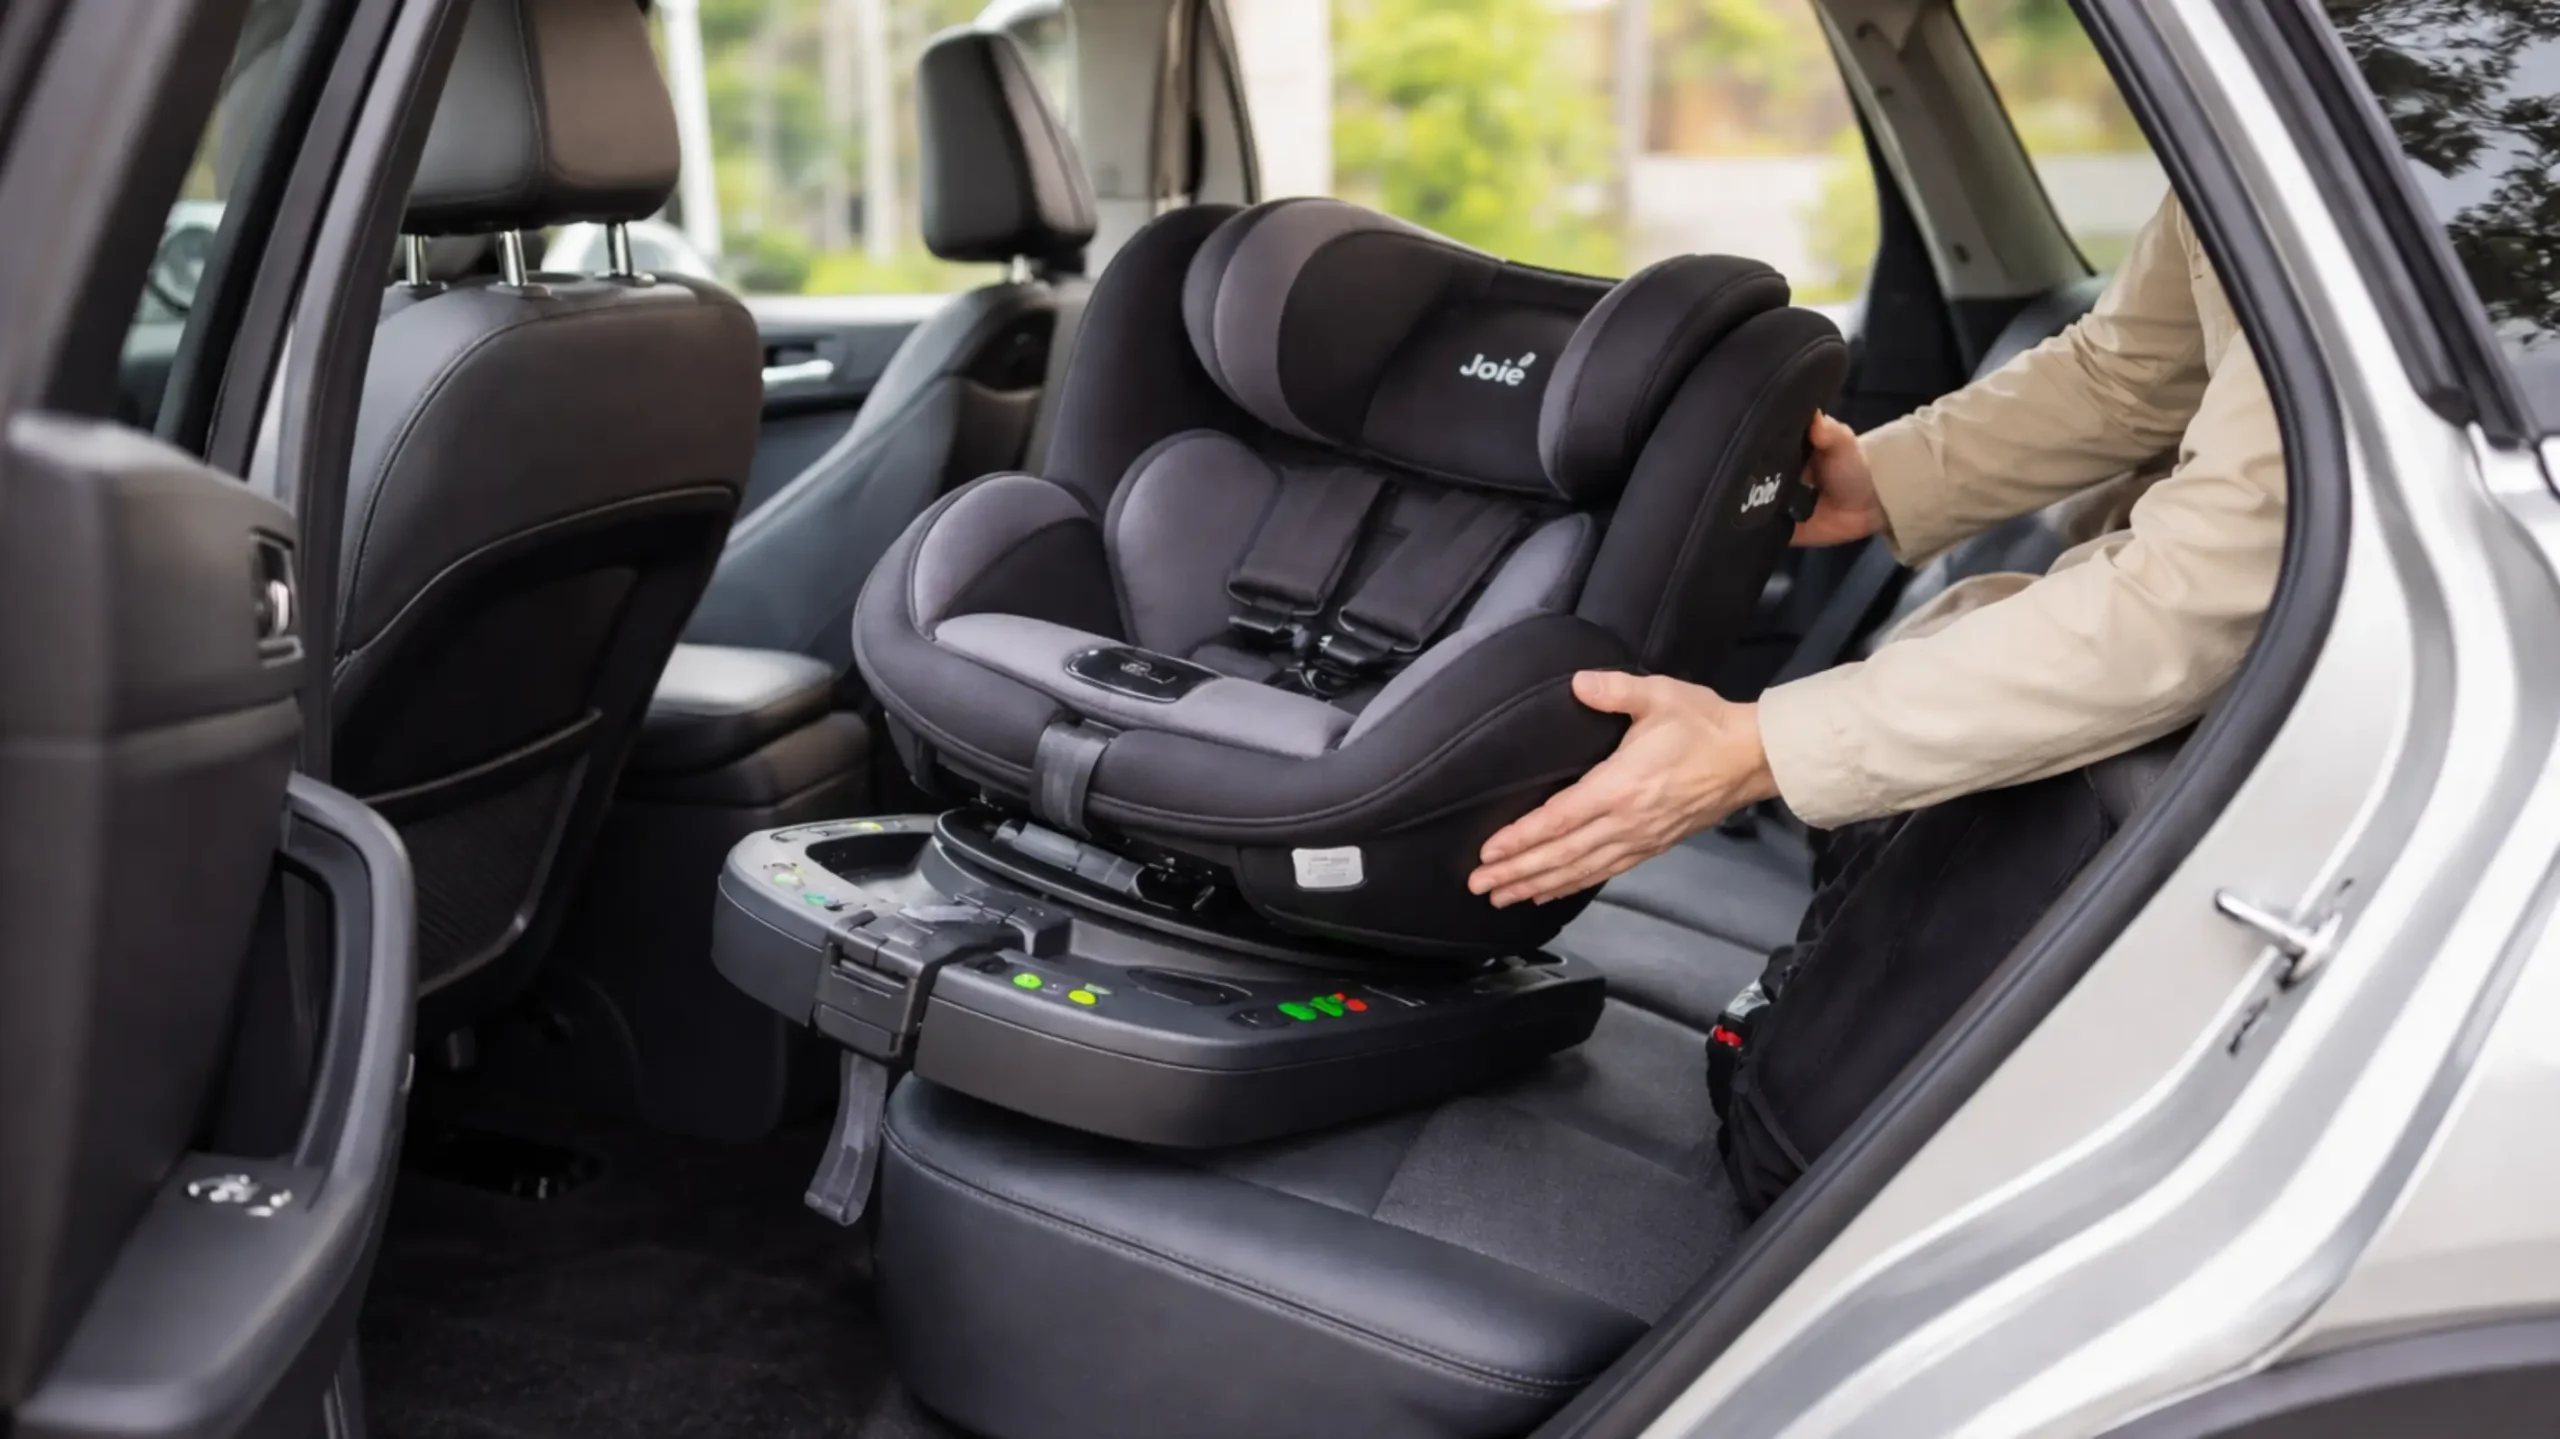
How to Take Out a Joie 360 Installed with ISOFIX
ISOFIX is secure. Very secure. That’s the point. But once you understand the release sequence, it becomes manageable.
Step 1 – Rotate the Seat to the Side
Start by rotating the seat toward the car door. This gives you better access to the base and release buttons.
Press the swivel button and turn the seat sideways.
Simple. But crucial.
You don’t want to reach blindly behind the seat. Visibility matters.
Step 2 – Retract the Support Leg
Before touching the ISOFIX connectors, deal with the support leg.
- Locate the support leg adjustment button.
- Press the release mechanism.
- Shorten the leg completely.
- Fold it into its storage position (if applicable).
Why this matters:
If the support leg is still extended, it creates downward pressure. That pressure can make the ISOFIX connectors feel jammed.
Release pressure first. Then disconnect anchors.
Step 3 – Release the ISOFIX Connectors
Now we’re getting to the heart of how to take Joie 360 car seat out safely.
Locate the ISOFIX release levers. On most Joie 360 models, they’re at the front of the base or on either side.
Here’s the sequence:
- Pull the seat slightly away from the vehicle seat back.
- Engage the ISOFIX release mechanism.
- Watch the indicator window change from green to red.
- Repeat on both sides if required.
Some models require pulling a central strap that retracts both connectors simultaneously.
If it doesn’t release immediately, pause. Do not yank.
Instead:
- Push the seat slightly toward the car seat.
- Then pull the release again.
- Apply steady, even pressure.
It’s often tension—not a mechanical fault—that’s holding it in place.
Step 4 – Pull the Seat Away From Anchor Points
Once both ISOFIX connectors are released (red indicator visible), gently pull the entire seat forward.
Use a controlled motion.
No twisting.
No jerking.
The seat is heavy. Expect it.
Lift with your legs, not your back. Yes, even in a parking lot.
Common ISOFIX Removal Problems
Sometimes the process isn’t smooth. Here’s how to troubleshoot:
- Indicator still green → Connector is still engaged. Reapply release pressure.
- Seat won’t move → Support leg may still be extended.
- Connector feels stuck → Slightly push the seat inward to relieve tension before pulling.
- Debris in anchor point → Check for crumbs, small objects, or upholstery interference.
Force is never the solution.
How to Remove a Joie 360 Installed with a Seat Belt
Seat belt installations are less common with Joie 360, but they do exist. The removal process is different—and often easier.
Let’s break it down.
Step 1 – Rotate the Seat for Access
Turn the seat toward the door again. This exposes the belt path and buckle.
You want visibility. Always.
Step 2 – Locate the Belt Routing Path
The belt path depends on orientation:
- Rear-facing → Belt runs through rear belt guides on base.
- Forward-facing → Belt routes through forward-facing guides.
Open any lock-off clips holding the belt tightly in place.
These clips create tension. Release them before unbuckling.
Step 3 – Unbuckle the Vehicle Seat Belt
Press the red buckle button. Hold the belt as it retracts.
Do not let it snap back.
Letting it retract violently can:
- Damage the belt
- Cause injury
- Create sudden tension
Control the movement.
Step 4 – Lift the Seat Out
Once the belt is fully disengaged, lift the seat straight up and out.
Again—bend your knees. The Joie 360 is not lightweight.
Common Seat Belt Removal Problems
- Belt won’t loosen → It may be locked in retractor mode. Slowly pull the belt out fully, then allow it to retract normally.
- Seat feels wedged → Check for twisted belt beneath base.
Stay methodical. Every time.
Removing a Joie 360 From a Small or Tight Vehicle
Compact cars add another layer of difficulty. Limited space means limited leverage.
Here’s what works:
- Slide front seats forward completely.
- Recline them temporarily if needed.
- Use a flashlight to locate ISOFIX release buttons.
- Work from outside the vehicle, not kneeling inside.
If necessary, open both rear doors for better positioning.
Sometimes the challenge isn’t mechanical—it’s spatial.
Safety Checks After Removing the Car Seat
You’ve figured out how to take the Joie 360 car seat out. Great. Don’t stop there.
Inspect the seat before storing or reinstalling.
Check:
- ISOFIX arms retract smoothly.
- Support leg locks correctly.
- No cracks in plastic housing.
- Harness straps untwisted.
- Indicator windows functioning.
Here’s a quick checklist:
| Component | What to Look For |
| ISOFIX Connectors | Smooth extension/retraction |
| Support Leg | Locks and adjusts easily |
| Base | No cracks or loose parts |
| Harness | No fraying or twisting |
If anything feels loose or damaged, do not reinstall until resolved.
Preparing the Joie 360 for Reinstallation
If you’re switching vehicles, reset everything first.
- Fully retract ISOFIX connectors.
- Shorten support legs.
- Rotate the seat to the forward-facing position.
- Untwist harness straps.
- Confirm indicator windows reset.
Transport it upright if possible. Avoid tossing it into the trunk sideways with luggage pressing against it.
Child safety equipment deserves respect.
Final Thoughts
Learning how to take Joie 360 car seat out isn’t complicated—but it does require order and patience. Rotate first. Relieve pressure. Release connectors. Then lift.
That sequence matters.
The Joie 360 is engineered to protect a child in a collision at high speed. It’s not meant to pop out casually. And that’s reassuring! When installed correctly, it holds firm. When removed correctly, it disengages cleanly.
If you ever feel stuck, pause. Reassess tension points. Work deliberately.
And next time someone asks you how to take Joie 360 car seat out, you’ll know exactly what to say—start with the support leg!
Frequently Asked Questions (FAQs)
If you see ISOFIX connectors and a support leg, it’s ISOFIX; if the vehicle belt runs through the base, its seat belt is installed.
Rotate the seat toward the door so you can clearly access the support leg and release points.
Yes—retracting the support leg reduces pressure and makes the ISOFIX connectors release much more easily.
It’s usually tension, not a broken mechanism—push the seat slightly inward, then pull the release again.
Yes, removal should be tool-free; if you feel like you need tools, something is likely still locked.
Green means locked and secure, while red means it’s released or not installed correctly.
Open the lock-off (if used), unbuckle the belt, then pull the belt free from the routing path before lifting the seat out.
No—forcing it can damage the ISOFIX arms or base, so it’s better to release tension and try again.
Check the ISOFIX arms, support leg, base, and harness for smooth movement, wear, or cracks before reinstalling.
Reset everything first: retract ISOFIX arms, shorten the support leg, rotate the seat forward, and keep the belt path clear.