If you’ve ever buckled your child into their seat, stepped back, and thought, “Wait… are these straps actually right?” — you’re not alone. Learning how to adjust Joie 360 car seat straps is one of those parenting skills that feels intimidating at first, but becomes second nature once you understand the system. And here’s the good news: the Joie 360 is designed to make adjustments straightforward, even for busy, sleep-deprived humans like the rest of us!
In this guide, I’ll walk you through exactly how to adjust Joie 360 car seat straps, how to know when it’s time to adjust them, and how to troubleshoot the common issues that cause straps to twist, loosen, or refuse to tighten. We’ll keep it practical, safety-focused, and refreshingly clear.
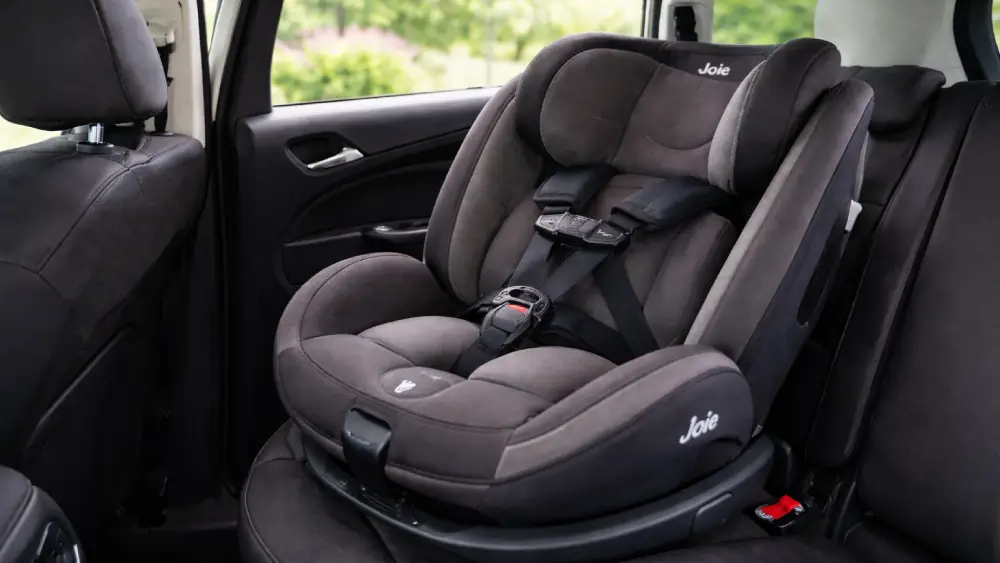
Understanding the Joie 360 Harness System
Before we get hands-on, it helps to understand what you’re working with.
The Joie 360 car seat uses a 5-point harness, meaning your child is secured at five key points:
- Left shoulder
- Right shoulder
- Left hip
- Right hip
- Between the legs (the buckle)
This harness design spreads crash forces across stronger parts of the body (shoulders and hips) and keeps your child positioned correctly. It’s one of the safest restraint systems when used properly.
What makes the Joie 360 different?
The big feature is the 360-degree rotation. That rotating base makes it easier to get your child in and out without awkward bending, especially in tight parking spaces.
However, the rotation can also create a few common strap issues:
- Harness straps shift slightly as the seat turns
- Straps get pulled unevenly if one side is tugged more than the other
- The harness can twist if it’s not lying flat
None of this is dangerous by itself — but it does mean you need to be a little more intentional about strap setup.
Harness height adjustment vs tightening
This is where many parents get stuck.
- Harness height adjustment = moving the shoulder straps to the correct slot for your child’s height
- Harness tightening = pulling the adjustment strap so the harness fits snugly
Both matter, and both are part of learning how to adjust Joie 360 car seat straps correctly.
When Should You Adjust Joie 360 Car Seat Straps?
Harness adjustments aren’t a “set it once and forget it” situation. Kids grow fast. Clothing changes. Even small shifts in posture can change fit.
Here are the most common times you’ll need to adjust:
1) After a growth spurt
If your child suddenly looks like they’ve leveled up overnight, check the harness height and tightness.
2) When switching seasons
Winter coats can cause dangerous slack, while thinner summer clothes may make the harness feel tighter than expected.
3) When straps start looking “off”
Even if your child hasn’t grown much, straps can drift into an uneven position over time.
4) When you switch seat direction
Rear-facing and forward-facing have different harness height rules (we’ll cover this in detail later).
Quick warning about bulky clothing
If you take one thing away from this article, let it be this: thick coats do not belong under car seat straps. They create the illusion of tightness, but compress in a crash, leaving the harness loose.
Safety Checks Before Adjusting the Straps
Before I explain how to adjust Joie 360 car seat straps, I want to cover a few important safety checks. These take less than a minute and prevent a lot of frustration.
Do this first:
- Confirm the seat is installed securely (minimal movement at the belt path)
- Make sure the seat is locked into the correct mode (rear-facing or forward-facing)
- Rotate the seat to a comfortable working angle
- Check that the harness straps are not twisted
- Confirm the buckle and chest clip are properly assembled and functioning
What you should not do:
- Don’t lubricate the harness system with oils or sprays
- Don’t remove stitching, padding, or harness components unless the manual specifically instructs it
The Joie 360 is engineered with safety tolerances, and DIY modifications can reduce its effectiveness.
Step-by-Step: How to Adjust Joie 360 Car Seat Straps
Now for the main event! Let’s walk through how to adjust Joie 360 car seat straps step by step in a way that’s easy to follow.
Step 1: Loosen the harness
Before you can adjust anything properly, you need slack.
Here’s how I do it:
- Locate the harness release button (usually near the front of the seat under a fabric flap)
- Press and hold the button
- With your other hand, pull the shoulder straps forward gently
You’re not pulling the tightening strap yet — you’re pulling the harness itself.
Tip: Pull both shoulder straps evenly. If you yank one side, you can accidentally create uneven tension.
Step 2: Position your child correctly
This step is underrated. The best harness adjustment in the world won’t help if your child is sitting slouched or halfway perched on the padding.
Make sure:
- Their bottom is all the way back in the seat
- Their back is flat against the seat
- The straps lie flat across the body
If your child is a wiggler (and honestly, most are), I find it helps to give them a “job,” like holding a toy or looking out the window while you buckle.
Step 3: Adjust harness height (the shoulder strap slots)
This is the part that feels most confusing, but it’s actually pretty logical.
The basic rule:
- Rear-facing: straps should come from at or just below your child’s shoulders
- Forward-facing: straps should come from at or just above your child’s shoulders
That’s it. That’s the golden rule.
If the straps are too high in rear-facing mode, the child can slide upward in a crash. If the straps are too low in forward-facing mode, the child’s body can shift too much.
How to change the harness height
Depending on your exact Joie 360 model, harness height adjustment may be:
- A rethread system (manual moving through slots), or
- A headrest/harness height adjuster that moves together
Either way, the goal is the same: correct shoulder level positioning.
My practical advice:
After you adjust, tug gently on both straps and make sure they move smoothly and evenly. If one strap feels “stuck,” it’s often caught behind padding or routed incorrectly.
Step 4: Tighten the straps properly
Now we’re at the step most people focus on: tightening.
To tighten:
- Buckle the harness
- Clip the chest clip
- Pull the adjustment strap (usually at the front of the seat)
You want the harness snug, not crushing.
Use the pinch test
This is the most reliable method for checking harness tightness.
- Try to pinch the strap material at your child’s shoulder
- If you can pinch and fold it, it’s too loose
- If you can’t pinch any slack, you’re good
This is the difference between “looks tight” and “is actually tight.”
Important: Tighten evenly. If one strap is tighter than the other, your child can end up shifted to one side, which affects both comfort and positioning.
Step 5: Position the chest clip correctly
The chest clip is not just decoration — it keeps the shoulder straps properly aligned.
The correct position is:
- Armpit level (center of the chest)
Not belly level, not neck level, not floating somewhere random.
If the chest clip is too low, straps can slip off shoulders. If it’s too high, it can press into the neck.
Rear-Facing vs Forward-Facing Strap Adjustment Differences
This section matters a lot, because the rules change depending on seat orientation. And yes — it’s easy to mix them up.
Here’s a simple table to make it crystal clear:
| Mode | Shoulder Strap Position | Why It Matters |
| Rear-facing | At or just below shoulders | Prevents upward movement in a crash |
| Forward-facing | At or just above shoulders | Reduces forward body shift |
Switching modes? Don’t forget these
When you transition from rear-facing to forward-facing:
- Re-check harness height
- Re-check recline position (if adjustable)
A lot of parents assume rotation mode handles everything automatically. It doesn’t — it just makes access easier.
And yes, learning how to adjust Joie 360 car seat straps is slightly different once you flip forward-facing.
Common Problems and How to Fix Them
Even after you know how to adjust Joie 360 car seat straps, you might run into one of these annoyingly common issues. Let’s troubleshoot like pros.
Problem 1: The straps won’t tighten
This is one of the most frequent complaints.
Possible causes:
- The harness is twisted behind the seat padding
- The splitter plate (back of seat) is misaligned
- Crumbs or debris are blocking the tightening mechanism
- The straps are caught under the child’s back
Fix:
- Fully loosen the harness
- Check for twists from the shoulders down
- Lift padding if accessible and confirm straps are routed correctly
- Pull the tightening strap in a smooth, straight motion
Problem 2: The straps loosen on their own
This can feel scary, but it’s usually mechanical slack caused by movement.
Possible causes:
- Straps weren’t tightened evenly
- Child is wiggling and pulling slack
- The harness wasn’t snug enough to begin with
Fix:
- Tighten using the pinch test
- Confirm the chest clip is at armpit level
- Make sure straps lie flat across shoulders
Problem 3: Uneven strap tension
One strap feels tight, the other feels loose.
Why it happens:
- One side got pulled forward during loosening
- The harness shifted during rotation
- The straps are twisted behind the seat
Fix:
- Loosen fully
- Pull both straps evenly forward
- Re-tighten smoothly
Problem 4: Twisted straps
Twisted straps aren’t just annoying — they reduce surface contact and can create pressure points.
Fix:
- Remove slack
- Straighten the strap fully
- Make sure it lies flat through the slot and chest clip
Problem 5: The harness feels stiff
Some stiffness is normal, especially in new seats.
Fix:
- Pull straps slowly and evenly
- Avoid sudden jerks
- Ensure the harness isn’t rubbing against padding or plastic edges
Maintenance Tips to Keep Joie 360 Straps Working Properly
If you want harness adjustments to stay easy, a little maintenance goes a long way.
Here’s what I recommend checking monthly (or anytime something feels “off”):
Quick harness maintenance checklist
- Inspect straps for fraying or fuzzing
- Check the chest clip for cracks or stiffness
- Confirm straps are not twisted behind padding
- Remove crumbs from the seat base area
- Make sure the tightening strap pulls smoothly
Cleaning tips (important!)
Harness straps should not be soaked, scrubbed harshly, or cleaned with strong chemicals. The webbing is engineered to specific strength standards, and harsh cleaning can weaken it.
Stick to:
- Light wiping with mild soap and water
- Air drying (no heat)
- Spot cleaning only
If you’re unsure, always defer to your specific Joie manual.
Final Safety Reminder and Conclusion
Once you learn how to adjust Joie 360 car seat straps, it stops feeling like a mysterious parent ritual and starts feeling like a quick, confident routine. Loosen first, position your child correctly, confirm harness height, tighten using the pinch test, and set the chest clip at armpit level. That’s the winning formula.
And here’s the best part: you don’t have to be perfect — you just have to be consistent. Every time you check the harness fit, you’re doing something genuinely meaningful for your child’s safety. That’s parenting done right!
If you want, I can also write a quick printable checklist version of this guide so you can keep it on your phone for easy reference.
Frequently Asked Questions
If you can pinch extra webbing at the shoulder, the harness is too loose and needs tightening.
They should be snug enough that you can’t pinch slack at the shoulders, but not so tight they leave deep marks.
The chest clip should sit at armpit level, centered on the chest.
Yes—rear-facing straps should be at or below the shoulders, while forward-facing straps should be at or above.
This is often caused by twisted straps, straps caught behind padding, or debris blocking the tightening mechanism.
Rotation can shift the harness slightly, especially if one strap was pulled more than the other during buckling.
Yes, and it’s usually best because you’re adjusting to their real seated position.
No—bulky coats create hidden slack and can make the harness unsafe in a crash.
It’s smart to check quickly before every ride, especially for younger children who grow fast.
Loosen first, set the right shoulder height, tighten using the pinch test, and place the chest clip at armpit level.