Let’s be honest. The first time you unbox a rotating car seat, it can feel like you just adopted a small, complicated robot. There are levers. There are color indicators. There’s a support leg that looks like it belongs on a spaceship. And yet the mission is simple: keep your child safe. In this guide, I’m going to walk you through how to install the Joie Spin 360 car seat the right way—step by step, with clear checks, real-world tips, and the kind of details most “quick guides” skip.
Because when it comes to car seats, close enough isn’t good enough.
Before You Begin: Set Yourself Up for Success
If you try to install this seat while your child is crying, your coffee is getting cold, and you’re parked at an awkward angle in your driveway… you’ll hate your life for 20 minutes.
So let’s not do that.
Give yourself a calm setup window. Ten minutes of prep will save you thirty minutes of frustration. And yes, I’m speaking from experience!
1) Confirm Your Vehicle Can Support This Installation
The Joie Spin 360 is typically installed using ISOFIX (also called LATCH in some regions). That means your vehicle needs ISOFIX anchor points in the seat you’re using.
Most modern vehicles have them. But don’t guess.
Check your vehicle manual and look for the ISOFIX/LATCH diagram. If you’re unsure, slide your fingers into the seat crack and feel for two metal bars. They’re usually about the width of your hand apart.
2) Choose the Best Seat Position
If you have options, choose wisely. Not every seat in your car is equally convenient, and not every seat is equally compatible.
Here’s a practical hierarchy:
- Rear passenger side (best balance of safety + easy access)
- Rear middle (often safest in theory, but not always compatible with ISOFIX)
- Rear driver side (fine, but less convenient for loading/unloading)
Avoid the front seat unless your manual specifically says it’s okay and airbag rules are followed. That’s not a place to gamble.
3) Do a Quick Fit Check for Your Child
Before you install, confirm you’re using the correct mode:
- Rear-facing is generally safest for as long as your seat allows.
- Forward-facing is for older, heavier children.
Your exact limits depend on your specific Joie Spin 360 model and local regulations, so use your manual for the official numbers. But the principle stays the same: rear-facing as long as possible.
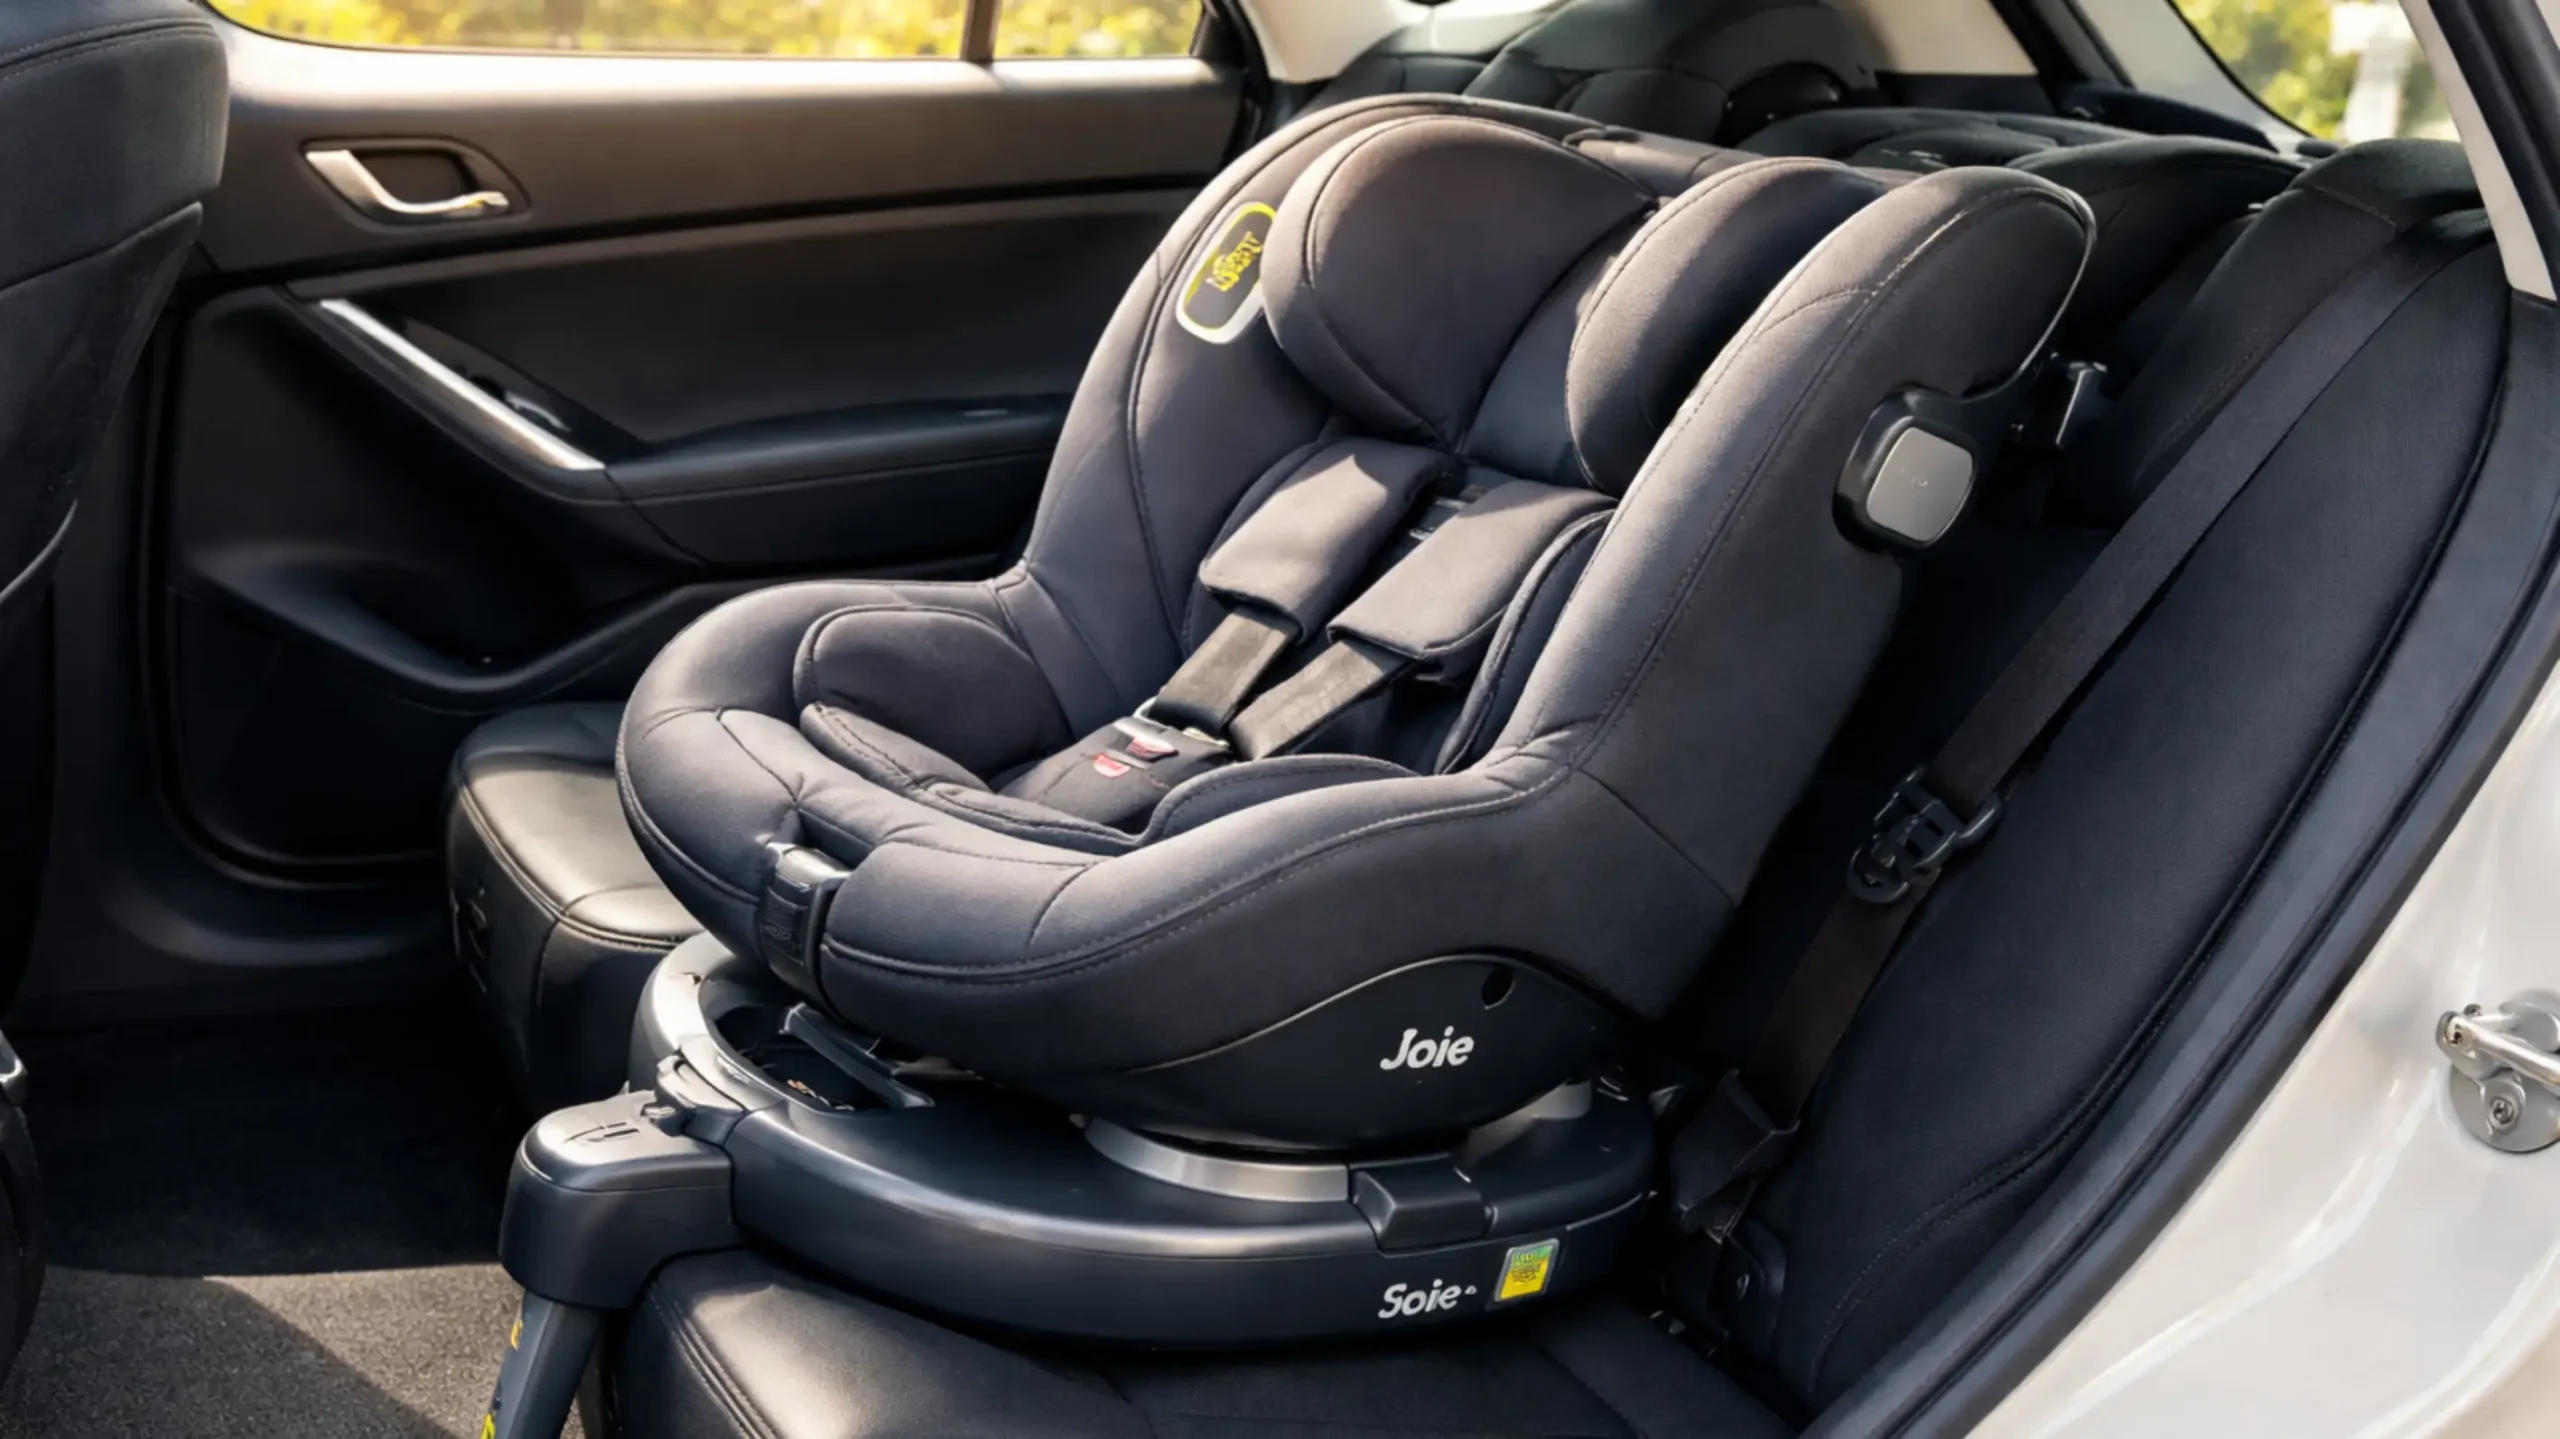
Understanding the Joie Spin 360: The Parts That Matter
You don’t need to memorize every button. You just need to understand the components that make installation safe.
The 4 Key Pieces You’ll Use
- ISOFIX connectors
These slide out from the base and click into your car’s ISOFIX anchor points. - Support leg (load leg)
This extends down to the vehicle floor and reduces movement in a crash. - Rotation lock
The seat spins for easy loading, but it must lock into the correct travel position before driving. - Recline positions
Rear-facing and forward-facing have different safe recline angles.
Here’s the thing. Most installation errors don’t come from “forgetting a step.” They come from misunderstanding one of these four parts.
How to Install Joie Spin 360 Car Seat Rear-Facing (Step-by-Step)
Rear-facing is where this seat really shines. It’s safer. It’s more protective for head and neck. And the spin feature makes daily use way easier.
So let’s do this properly.
Step 1: Set the Seat to Rear-Facing Mode
Before attaching anything, make sure the seat is positioned for rear-facing use.
- Rotate the seat so it faces the rear of the car.
- Select the correct recline setting for rear-facing.
This matters more than people realize. A wrong recline angle can make your child’s head slump forward, especially when sleeping.
Not ideal. Not safe.
Step 2: Extend the ISOFIX Connectors
Look for the ISOFIX release button/lever (usually at the front of the base). Pull it and extend both ISOFIX arms.
You want them fully extended.
This gives you more room to line everything up. And it makes clicking into the anchors much easier.
Step 3: Click the ISOFIX Arms Into the Vehicle Anchors
Now push the base toward the seat crease until both ISOFIX connectors click into place.
You should hear a distinct click.
And then—this is the key part—check the indicator.
Most Joie models use a red-to-green indicator system:
- Green = locked and safe
- Red = not locked or not secure
Don’t move on until both sides show green.
Step 4: Push the Seat Back to Tighten
Once connected, press the base firmly into the vehicle seat.
You’re not trying to crush your upholstery. But you do want a tight, stable fit.
A trick I use: put one knee gently into the seat base while pushing it back. It helps seat the connectors deeper.
Step 5: Adjust the Support Leg
Now extend the support leg downward until it touches the vehicle floor.
This step is where a lot of people mess up. Not because it’s hard. Because it feels “good enough” too early.
You want:
- The leg straight
- The foot flat on the floor
- The indicator showing correct contact (usually green)
If your car has under-floor storage compartments, be careful. Some vehicles have a hollow storage bin under the footwell. The support leg may not be allowed to rest on a lid unless the manual explicitly permits it.
This isn’t a minor detail. It’s structural.
Step 6: Do the Movement Test (The Right Way)
Here’s the rule: check movement at the base, not the top of the seat.
Grab the seat near where the ISOFIX connectors attach and pull side-to-side.
Your seat should not move more than 1 inch (about 2.5 cm).
Some wiggle is normal. A loose seat is not.
Step 7: Secure Your Child Correctly
Once the seat is installed, harness fit becomes the next safety priority.
Use this checklist:
- Harness straps at or below shoulder height for rear-facing
- Chest clip at armpit level
- Harness tight enough to pass the pinch test (you can’t pinch extra strap)
If you can pinch fabric, it’s too loose.
Simple. Firm. Reliable.
Rear-Facing Setup Checklist (Quick Reference)
Here’s a quick table you can screenshot and keep handy:
| Step | What to Check | What “Correct” Looks Like |
| ISOFIX connection | Both arms attached | Both indicators show green |
| Seat stability | Movement at base | Less than 1 inch side-to-side |
| Support leg | Floor contact | Foot flat + indicator green |
| Recline angle | Rear-facing setting | Child’s head stays back, not slumped |
| Harness fit | Tightness + height | Snug + straps at/below shoulders |
This is the boring part. But boring is good when safety is the goal!
How to Install Joie Spin 360 Car Seat Forward-Facing (Step-by-Step)
Forward-facing installation uses many of the same steps. But the details change, and those details matter.
Also: don’t rush forward-facing.
Rear-facing protects the neck and spine better. If your child still fits rear-facing limits, stay there.
Step 1: Rotate the Seat Forward
Use the rotation handle and turn the seat to face the front of the vehicle.
Make sure it clicks into a locked travel position.
This is not optional. A rotating seat must lock before driving.
Step 2: Adjust Recline for Forward-Facing
Forward-facing recline is usually more upright.
Set it correctly before tightening everything.
Step 3: Attach ISOFIX Connectors
Same as rear-facing:
- Extend ISOFIX arms
- Click into anchors
- Confirm both indicators are green
Step 4: Extend and Secure the Support Leg
Yes, you still use the support leg in many Joie Spin 360 configurations.
Extend it until:
- It touches the floor firmly
- It stands straight
- It shows green on the indicator
Step 5: Stability Test Again
Movement test at the base.
Less than 1 inch.
Every time.
Step 6: Adjust Harness Height
Forward-facing rules change:
- Harness straps should be at or slightly above shoulder height
If the straps are coming from below the shoulders in forward-facing mode, that’s a safety issue.
How to Use the 360° Spin Safely (Without Getting Lazy)
The rotation feature is why people buy this seat. And I get it. It’s fantastic.
But it can also lead to bad habits.
Here are the non-negotiables:
- Rotate only when parked.
- Always lock the seat into rear-facing or forward-facing travel position.
- Never drive with the seat angled sideways.
- If it doesn’t click, don’t assume.
The seat should feel “set.” Not floating. Not halfway.
This is one of the biggest reasons people search for how to install a Joie Spin 360 car seat in the first place—they want to know what “locked” really feels like.
Safety Checks After Installation (Do These Every Time)
Once your seat is installed, do a final pass. It takes one minute.
And it catches mistakes.
The 60-Second Safety Scan
- Both ISOFIX indicators green
- Support leg indicator green
- Seat doesn’t move more than 1 inch at base
- Seat is locked into travel position
- Harness fits snugly
That’s it.
You don’t need a checklist taped to your dashboard. Just a habit.
Common Installation Mistakes (And How to Avoid Them)
This section is where you save yourself real pain. Because most car seat issues aren’t complicated. They’re small, quiet errors.
And they matter.
Mistake #1: Only One ISOFIX Side Is Locked
This happens more than people admit.
One side clicks. The other looks connected but isn’t. Or it’s still red.
Fix:
Detach both. Start again. Don’t “force” the second side.
Mistake #2: Support Leg Not Fully Extended
People stop too early because the seat feels stable.
But the support leg must be firmly contacting the floor with the correct indicator.
Fix:
Extend until the indicator is green and the leg is straight.
Mistake #3: Recline Angle Is Wrong
Too upright rear-facing can cause head slump. Too reclined forward-facing can reduce protection.
Fix:
Set recline before tightening everything.
Mistake #4: Testing Movement at the Wrong Spot
If you grab the top of the seat and yank, it will move. That’s normal.
You test at the base.
Fix:
Grip near the ISOFIX connection points.
Mistake #5: Harness Is Loose “Because They’ll Complain”
Kids complain about everything. They complain about toast. They complain about oxygen.
A loose harness is dangerous.
Fix:
Use the pinch test every time.
Troubleshooting: When Something Doesn’t Feel Right
Sometimes the installation steps are correct, but something still feels off.
Good instincts. Listen to them.
Here are common problems and how to solve them.
Problem: ISOFIX Won’t Click In
Possible causes:
- ISOFIX arms not extended enough
- You’re not aligned with the anchor bars
- Seat crease is too tight
Fix:
- Extend ISOFIX fully
- Pull the vehicle seat cushion slightly forward
- Try connecting one side first, then the other
Problem: The Seat Tilts or Looks Crooked
Possible causes:
- One ISOFIX connector is deeper than the other
- The vehicle seat is uneven
Fix:
- Disconnect and reinstall
- Push evenly while attaching
- Check both indicators again
Problem: Support Leg Won’t Reach the Floor
Possible causes:
- Seat is too far forward on the vehicle seat
- Wrong recline mode
- Floor design is unusual
Fix:
- Reposition the base deeper into the seat
- Confirm correct recline setting
- Check manual for vehicle restrictions
Problem: Rotation Feels Stiff
Possible causes:
- Seat isn’t level
- Seat isn’t fully locked into base position
Fix:
- Confirm base is tight and stable
- Rotate slowly while pulling the rotation handle fully
A Simple Installation Routine That Saves Time Later
Here’s the part nobody talks about: once your Joie Spin 360 is installed correctly, you want to keep it that way.
So build a routine.
Every week, do a 2-minute check:
- Push-pull test at base
- Indicator check
- Support leg contact check
- Harness inspection for twists
That’s it.
This is especially useful if multiple caregivers use the car. Or if your child likes kicking the seat base (which they will).
Quick “At a Glance” Rear vs Forward-Facing Setup
Here’s a table to make switching modes less stressful:
| Setup Area | Rear-Facing | Forward-Facing |
| Harness height | At/below shoulders | At/above shoulders |
| Recline | More reclined | More upright |
| Rotation use | Great for loading | Great for loading |
| Safety priority | Neck/spine protection | Head/chest restraint |
| Best practice | Use as long as allowed | Switch only when needed |
Final Tips for Long-Term Safety (The Stuff Professionals Actually Care About)
If you’re reading this, you’re already doing more than most people. Seriously.
Now let’s make sure your seat stays safe long-term.
Register the Seat
Registering your car seat helps you get recall notifications. It’s a quick step. It matters.
Avoid Secondhand Seats Unless You Know the Full History
If you don’t know whether it was in a crash, don’t use it.
Even a minor accident can compromise the structure.
Replace After Any Crash
Many manufacturers recommend replacement after crashes. Follow the seat manual.
Keep the Manual Accessible
Not tucked in a drawer. Not lost in a junk drawer. Put it in your glove compartment or take a photo of the key pages.
Conclusion: Install It Once. Trust It Every Day.
Learning how to install Joie Spin 360 car seat properly isn’t about being “extra.” It’s about being consistent. It’s about knowing your child is protected on your best days and your busiest ones.
And the good news?
Once you install it correctly, the seat becomes the easiest part of your routine. The spin feature feels effortless. Loading your child feels smooth. And every click and green indicator becomes a quiet confirmation that you did it right.
So take your time. Follow the steps. Trust the checks.
And if you ever feel unsure, reinstall from scratch. It’s not failure. It’s responsibility.
Because when you know how to install Joie Spin 360 car seat the right way, you’re not just following instructions.
You’re building safety into every ride.
Frequently Asked Questions
Most first-time installations take 15–25 minutes, but once you understand how to install Joie Spin 360 car seat properly, it usually takes under 10 minutes.
Most models are designed for ISOFIX installation, so check your manual to confirm whether seatbelt installation is permitted for your specific version.
When properly installed, the seat should not move more than one inch side-to-side at the base.
Yes, if your model requires it; the support leg is a critical safety component and must be firmly touching the vehicle floor.
Yes, rear-facing provides better neck and spine protection and is recommended for as long as your seat allows.
No, the seat must always be locked into a rear-facing or forward-facing travel position before driving.
Check that both indicators show green and confirm the base doesn’t move more than one inch at the anchor point.
Recheck your recline setting and base positioning, and consult your vehicle and seat manual for compatibility guidance.
Perform a quick stability and indicator check weekly, especially if multiple caregivers use the vehicle.
Always refer to your Joie Spin 360 manual for exact specifications and regional compliance details.