Installing a rotating car seat can feel overwhelming at first. The Joie 360 is designed to make everyday use easier, but correct installation is what makes it safe. Learning how to install Joie 360 car seat properly ensures the rotation locks correctly, the recline angle is accurate, and your child is protected on every trip.
A seat that looks secure isn’t always installed correctly. Small details—like recline position or anchor tension—matter more than most parents realize. This guide walks you through the entire installation process clearly and step by step.
Let’s begin.
Understanding the Joie 360 Car Seat System
The Joie 360 is a rotating car seat designed for rear-facing and forward-facing use, depending on your child’s age and size.
Key features include:
- 360-degree rotation for easier loading
- ISOFIX installation system (no seat belt routing)
- Support leg for added stability
- Built-in recline and rotation locks
Correct installation allows all of these safety features to work as intended.
Before Installing the Joie 360 Car Seat
Preparation helps avoid mistakes.
Before starting:
- Confirm your child meets the rear-facing requirements
- Choose a rear seating position
- Locate the vehicle’s ISOFIX anchor points
- Ensure the vehicle is parked on level ground
Always review both the Joie manual and your vehicle owner’s manual.
How To Install Joie 360 Car Seat (Rear-Facing)
Most installations begin in rear-facing mode.
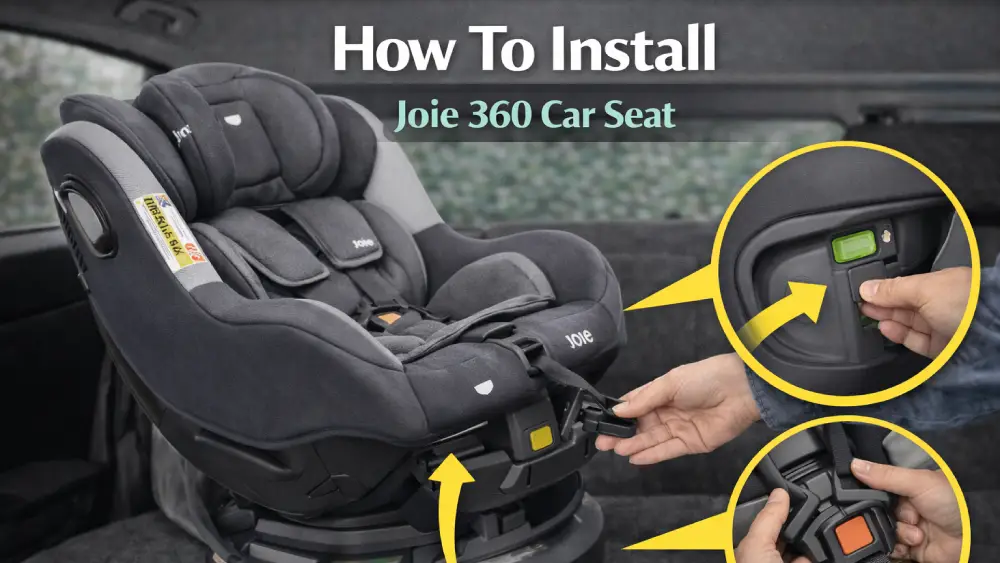
Step 1: Extend the ISOFIX connectors
Press the ISOFIX release buttons on the base and extend both connectors fully.
Step 2: Attach to the ISOFIX anchors
Align the connectors with your vehicle’s ISOFIX anchor points. Push the seat firmly into the anchors until you hear a click on both sides.
Check the indicators to confirm they turn green.
Step 3: Deploy the support leg
Pull down the support leg until it reaches the vehicle floor. Adjust it until the indicator shows proper contact.
The support leg should rest firmly on the floor, not on storage compartments.
Step 4: Adjust the recline
Use the recline control to set the approved rear-facing recline position. Confirm the recline indicator is within range.
Step 5: Lock the rotation
Rotate the seat until it clicks into the rear-facing travel position. Always confirm the lock before driving.
Using the Rotation Feature Correctly
Rotation is for loading only.
Safe rotation tips:
- Rotate the seat only when parked
- Turn the seat toward the door for easy access
- Lock it back into a travel position before driving
Never drive with the seat unlocked or sideways.
Installing the Joie 360 Forward-Facing (When Ready)
Forward-facing installation should only be done once your child meets Joie’s requirements.
Forward-facing setup steps:
- Switch the seat to forward-facing mode
- Keep ISOFIX connectors attached
- Confirm the support leg remains deployed
- Adjust recline to the approved forward-facing position
- Rotate and lock the seat into the forward-facing travel position
Joie 360 seats do not use top tethers; the ISOFIX and support leg provide stability.
How To Check If the Joie 360 Is Installed Correctly
Before driving:
- ISOFIX indicators show green
- Support leg indicator shows correct contact
- Seat moves less than one inch
- Recline indicator is within range
- Rotation locks securely
If anything feels loose or misaligned, reinstall before use.
Common Installation Mistakes to Avoid
These issues appear often:
- Forgetting to deploy the support leg
- Ignoring indicator colors
- Installing on uneven floor compartments
- Driving with the seat unlocked
- Adjusting recline after tightening without rechecking
Each mistake can reduce safety.
Final Thoughts
Learning how to install Joie 360 car seat correctly makes everyday travel safer and less stressful. Once installed properly, the rotating feature becomes intuitive, and daily loading feels effortless.
Frequently Asked Questions
The Joie 360 installs using ISOFIX connectors and does not require a seat belt for installation.
Yes, the support leg must always be deployed and properly adjusted for safe installation.
Check that the ISOFIX and support leg indicators show green and the seat moves less than one inch.
It must be installed in a seating position with ISOFIX anchor points and a solid floor for the support leg.
No, children should remain rear-facing until they meet Joie’s minimum age and size requirements.
No, the Joie 360 relies on ISOFIX and the support leg instead of a top tether.
No, rotation should only be used when parked; the seat must be locked before driving.
Recline should be adjusted after ISOFIX attachment and then rechecked once fully secured.
Reattach the ISOFIX connectors or adjust the support leg until the indicator turns green.
Check the installation regularly and after any adjustment, vehicle change, or long trip.