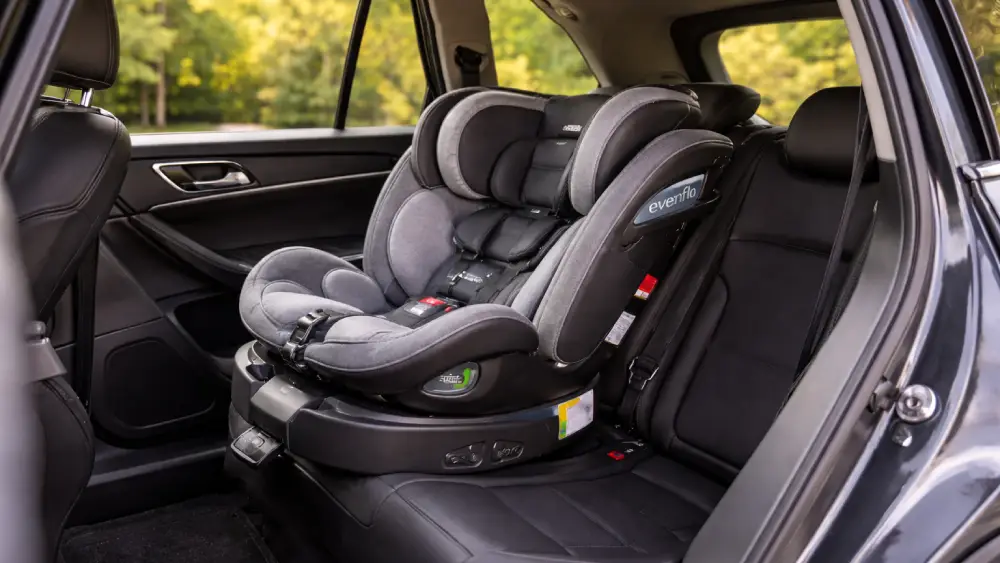
If you’re searching for how to install Evenflo car seat 360, you’re in the right place. I’ve helped enough parents (and stressed-out grandparents!) to know that car seat installation can feel way more intimidating than it should. The Evenflo 360 is an amazing seat—especially because it rotates and makes loading your child so much easier—but that same feature can also make people second-guess the setup.
The good news? Once you understand the steps, it’s completely manageable. In this guide, I’ll walk you through exactly how to install Evenflo car seat 360 in both rear-facing and forward-facing modes, using either LATCH or a seat belt. I’ll also show you the safety checks that matter most, plus the mistakes that trip people up.
Let’s get your seat installed securely so you can drive with confidence.
Understanding the Evenflo 360 Car Seat (Before You Install)
Before we jump into the “do this, click that” part, it helps to understand what makes the Evenflo 360 different from a typical convertible car seat.
Most convertible seats stay in one fixed position. The Evenflo 360 rotates toward the door so you can place your child in the seat without twisting your back or leaning awkwardly into the vehicle. If you’ve ever installed a seat and then tried to buckle a wiggly toddler in a cramped back seat, you already know why this is a big deal!
Key Features You’ll Notice Right Away
Here are the features most people interact with during installation:
- 360-degree rotation (for loading and unloading)
- Rear-facing and forward-facing modes
- LATCH system compatibility
- Seat belt installation option
- Recline settings for proper angle
- Level indicator to confirm safe positioning
Rear-Facing vs. Forward-Facing Limits (Important!)
Evenflo models vary slightly. Some versions have different height and weight ranges depending on the exact seat you purchased. That’s why I always recommend checking the label on your seat and the manual.
That said, the general rule is:
- Rear-facing is for smaller children and is the safest position for as long as your child fits within the limits.
- Forward-facing is for older toddlers and preschoolers who meet the seat’s requirements.
If you’re unsure, always choose rear-facing until your child outgrows it. Safety-wise, it’s not even close.
Before You Begin: 3 Things Notes I Never Skip
When people struggle with how to install Evenflo car seat 360, it’s usually not because they can’t follow directions. It’s because they started in the wrong place.
Here’s how I set myself up for success before touching the straps.
1) Read Two Manuals (Yes, Two)
You need:
- The Evenflo car seat manual
- Your vehicle owner’s manual
Your vehicle manual will tell you:
- Where LATCH anchors are located
- Which seats allow LATCH
- Where the top tether anchors are
- How your seat belts lock
That last part matters a lot!
2) Pick the Best Seating Position
The safest spot is typically:
- Back seat
- Away from active airbags
If you can install in the center position securely, great. If not, outboard (behind driver or passenger) is totally fine. A secure installation beats a “perfect” location with a loose fit every time.
3) Decide: LATCH or Seat Belt?
You should use one method, not both (unless your manual explicitly says you can). Most of the time:
- LATCH is easier
- Seat belt is equally safe when done correctly
Rear-Facing Installation with LATCH (Step-by-Step)
Let’s start with what many parents find easiest: rear-facing + LATCH.
If you’re learning how to install Evenflo car seat 360 for the first time, this is a great starting point.
Step 1: Place the Seat Rear-Facing
Set the car seat on the vehicle seat so it faces the rear of the vehicle.
- Make sure it’s sitting flat on the vehicle cushion
- Don’t start tightening anything yet
- Confirm you’re using the correct recline position for rear-facing
Step 2: Find the Lower Anchors (LATCH)
Look for the small anchor points between the seat cushion and the seatback. Many cars have little LATCH icons or tags to mark them.
If you don’t see them right away, don’t panic. Sometimes they’re buried deep in the upholstery.
Step 3: Attach the LATCH Connectors
Connect the two lower anchors to the vehicle’s LATCH points.
You should:
- Hear a click
- Feel the connector lock on
- Tug gently to confirm it’s secure
Step 4: Tighten the LATCH Strap (The Key Move)
This is where installation becomes “secure” instead of “kind of okay.”
Here’s what I do:
- Put one hand in the seat where your child would sit
- Push down and back (not straight down only)
- Pull the tightening strap until all slack is removed
You want the seat to be snug and stable.
Step 5: Do the 1-Inch Test
Grab the seat at the belt path (where the strap routes through the seat). Try moving it side to side and front to back.
If it moves more than one inch, it’s too loose.
This one test alone solves about 80% of installation issues.
Step 6: Confirm Recline and Level
The Evenflo 360 includes a recline adjustment and a level indicator.
- If the seat is too upright, it may not be safe for an infant
- If it’s too reclined, it may not install tightly
Your goal is the correct angle and a tight fit.
Rear-Facing Installation with a Seat Belt (Step-by-Step)
If your vehicle doesn’t have LATCH in your preferred position—or if you simply prefer seat belt installation—this method works beautifully.
And yes, once you learn it, it’s just as secure.
Step 1: Route the Seat Belt Through the Rear-Facing Belt Path
Thread the lap portion of the seat belt through the rear-facing belt path exactly as shown in your Evenflo manual.
Important tips:
- Don’t twist the belt
- Keep it flat
- Make sure it sits fully in the belt path
Step 2: Buckle the Seat Belt
Click the buckle into place and pull the belt snug.
Step 3: Lock the Seat Belt (Critical)
This is the step people miss most when learning how to install Evenflo car seat 360.
Many seat belts lock in one of these ways:
- Switchable retractor: Pull the belt all the way out, then let it retract. It will “ratchet” back in and lock.
- Locking latch plate: The buckle itself locks the lap belt when tightened.
If you don’t lock the belt, the seat may feel tight at first… and then loosen over time.
Step 4: Tighten the Belt Completely
Just like with LATCH:
- Push down into the seat
- Pull slack out of the belt
- Keep pressure while tightening
Step 5: Do the 1-Inch Test Again
Same rule:
- Less than 1 inch of movement at the belt path
Forward-Facing Installation (LATCH or Seat Belt)
Now let’s cover forward-facing mode.
A lot of parents feel relieved switching to forward-facing because it looks “more comfortable.” But forward-facing requires one extra piece that rear-facing doesn’t: the top tether.
And it matters a lot.
Step 1: Switch the Seat to Forward-Facing Mode
Rotate and reposition the seat according to your manual.
Then:
- Select the correct forward-facing recline position
- Confirm the harness height is appropriate for your child
Step 2: Choose LATCH or Seat Belt
Here’s the most important forward-facing note:
LATCH has weight limits.
Your car manual and car seat manual will tell you the maximum child weight for using lower anchors. Once your child exceeds that limit, you must install using the seat belt (but you still use the top tether).
Step 3: Install with LATCH (If Allowed)
Attach the lower connectors and tighten the strap just like rear-facing.
Then do the 1-inch test.
Step 4: Install with Seat Belt (If Needed)
Route the seat belt through the forward-facing belt path, buckle, lock, and tighten.
Again:
- No twists
- Lock the belt
- Tighten fully
Step 5: Attach the Top Tether (Non-Negotiable)
The top tether reduces forward head movement in a crash.
To attach it:
- Locate the tether anchor (often behind the seat, on the ceiling, or in the cargo area)
- Hook the tether strap
- Pull it tight until snug
It shouldn’t be dangling loose. It should actively reduce movement.
Quick Comparison Table: LATCH vs Seat Belt Installation
Here’s a simple breakdown I use when helping parents decide.
| Installation Method | Pros | Cons | Best For |
| LATCH | Fast, simple, consistent | Has weight limits (especially forward-facing) | Most rear-facing installs |
| Seat Belt | Works in almost every seating position | Must lock belt correctly | Larger kids, forward-facing, center seat installs |
Using the 360 Rotation Feature Correctly
This is the fun part—and honestly, the whole reason people buy this seat.
But it comes with one big rule:
The seat must be locked in the correct travel position before driving.
When rotating:
- Rotate slowly
- Listen for the click
- Confirm the seat is fully seated in its locked position
If it’s halfway rotated or not latched, it’s not safe for travel.
A quick habit I recommend:
- After buckling your child, always tug the seat gently to confirm it’s locked.
It takes one second and gives peace of mind.
Final Safety Checks (The Ones That Actually Matter)
Once you’ve finished installation, I always do a quick “walk-through” like a checklist.
Installation Security Check
- Seat moves less than 1 inch at belt path
- No loose slack in LATCH strap or seat belt
- Belt is locked (if using seat belt)
Harness Fit Check
- Rear-facing: straps at or below shoulders
- Forward-facing: straps at or above shoulders
- Chest clip at armpit level
Clothing Check
Avoid bulky coats and thick hoodies under the harness. It creates slack, even if it feels tight.
If it’s cold:
- Buckle child normally
- Then place a blanket over them
Simple, safe, and cozy.
Common Mistakes to Avoid (And How to Fix Them)
Even smart, careful people make these mistakes. I’ve seen them all.
1) Not Locking the Seat Belt
Fix: Learn how your vehicle’s seat belt locks and always engage it.
2) Forgetting the Top Tether Forward-Facing
Fix: Always attach and tighten it. It’s one of the biggest safety upgrades.
3) Using Both LATCH and Seat Belt
Fix: Use one method unless Evenflo says otherwise.
4) Installing Too Loose
Fix: Push down while tightening. Most people don’t use enough pressure.
5) Incorrect Recline Angle
Fix: Use the level indicator and recline settings, not guesswork.
When to Get Professional Help (And Why It’s Worth It)
If you’re still unsure after following these steps, don’t feel embarrassed. Car seats can be tricky, and every vehicle has quirks.
You can get help from:
- A Certified Child Passenger Safety Technician (CPST)
- Some local community safety programs
- Evenflo support (for seat-specific questions)
A 15-minute check from a CPST can eliminate doubt completely. And honestly, that peace of mind is priceless.
Conclusion: You’ve Got This!
Learning how to install Evenflo car seat 360 can feel like a lot at first. But once you break it down—rear-facing vs forward-facing, LATCH vs seat belt, and the key safety checks—it becomes very doable.
If you remember only a few things, let them be these:
- Tight installation (less than 1 inch of movement) is everything
- Rear-facing is safest as long as your child fits
- Forward-facing requires the top tether
- The seat must be locked before driving
And yes… the rotation feature really is as life-changing as people say!
If you want, I can also write a quick printable checklist version of this guide so you can keep it in your glove box.
Frequently Asked Questions
It should move less than 1 inch at the belt path when you tug it side-to-side and front-to-back.
Usually no—most Evenflo models require you to choose one method unless the manual specifically says otherwise.
Rear-facing with LATCH is often the simplest, as long as your vehicle has accessible lower anchors.
Yes, if you’re using the seat belt method, it must be locked so the seat doesn’t loosen over time.
The tether attaches to your vehicle’s tether anchor, which is usually behind the seat, on the ceiling, or in the cargo area.
Yes—when forward-facing, it reduces forward head movement and improves crash protection.
Most of the time, the belt or LATCH strap still has hidden slack, so you’ll need to press down firmly while tightening.
No, it should always be locked into the correct travel position before you start driving.
Keep your child rear-facing as long as they stay within the seat’s height and weight limits for that mode.
If you’re unsure, a Certified Child Passenger Safety Technician (CPST) can confirm everything is secure in just a few minutes.