Installing a rotating car seat sounds complicated. It isn’t — but precision matters. If you’re wondering how to install Evenflo 360 car seat with seatbelt, you’re in the right place. Done correctly, a seatbelt installation is just as safe as LATCH. Done incorrectly, it can compromise protection in a crash. The difference is in the details.
I’ve installed dozens of rotating seats, and here’s the truth: most problems aren’t dramatic. They’re subtle. A slightly loose belt. A missed locking step. A tether left unused. This guide walks you through the exact steps to install the Evenflo 360 using your vehicle seatbelt, both rear-facing and forward-facing — with practical, actionable instructions you can apply immediately.
Let’s get it right the first time.
Before You Start: Gather What You Need
Preparation prevents frustration. Take five minutes and set yourself up properly.
You’ll need:
- Evenflo 360 car seat (base and seat fully assembled)
- Your vehicle owner’s manual
- The Evenflo manual
- Access to a locking seatbelt
Optional but helpful:
- A rolled towel (only if allowed in manual)
- A flashlight
- A second set of hands
Here’s the key rule: if your vehicle manual and the car seat manual conflict, follow the stricter instruction. Always.
Seatbelt installations are completely safe when done correctly. In many vehicles, they’re actually easier than LATCH.
Understanding How the Evenflo 360 Works
Before learning how to install Evenflo 360 car seat with seatbelt, you need to understand how this seat is built.
The Evenflo 360 has:
- A rotating seat attached to a fixed base
- A designated rear-facing belt path
- A separate forward-facing belt path
- An angle indicator for recline confirmation
The rotating feature makes loading easier. It does not change how the seat secures to the vehicle. That part is traditional and requires attention.
Using the wrong belt path is one of the most common installation errors. The rear-facing and forward-facing paths are clearly labeled. Slow down. Confirm orientation before routing the belt.
Rotation is convenience. Installation is safety.
Choosing the Best Spot in Your Vehicle
You have options. But not all positions are equal.
Common seating positions:
- Center rear seat
- Passenger-side rear seat
- Driver-side rear seat
The center position is often safest in theory because it’s farthest from side impact zones. However, not every vehicle allows secure installation there. Some center seats lack a proper locking seatbelt. Others have overlapping buckles that interfere with the belt path.
Check your vehicle manual for:
- Seatbelt locking mechanism type
- Tether anchor locations
- Restrictions on center installations
If the center seat doesn’t install tightly, move to an outboard position. A properly installed outboard seat is safer than a loose center seat.
Step-by-Step: Rear-Facing Installation With Seatbelt
This is the most common configuration. It’s also the safest position for young children.
Let’s walk through exactly how to install Evenflo 360 car seat with seatbelt in rear-facing mode.
Step 1: Set the Seat to Rear-Facing
Confirm the seat is locked into rear-facing mode. Check the labeling on the base. Adjust the recline position according to the manual.
Rear-facing seats must sit at the correct angle. Too upright? Head slump. Too reclined? Reduced crash protection.
Use the built-in angle indicator. It’s there for a reason.
Step 2: Position the Base
Place the base flat against the vehicle seat back. Make sure it sits flush.
Push it firmly into the seat crease — that gap where the seat bottom meets the seat back. That’s your anchor zone.
Check the recline again.
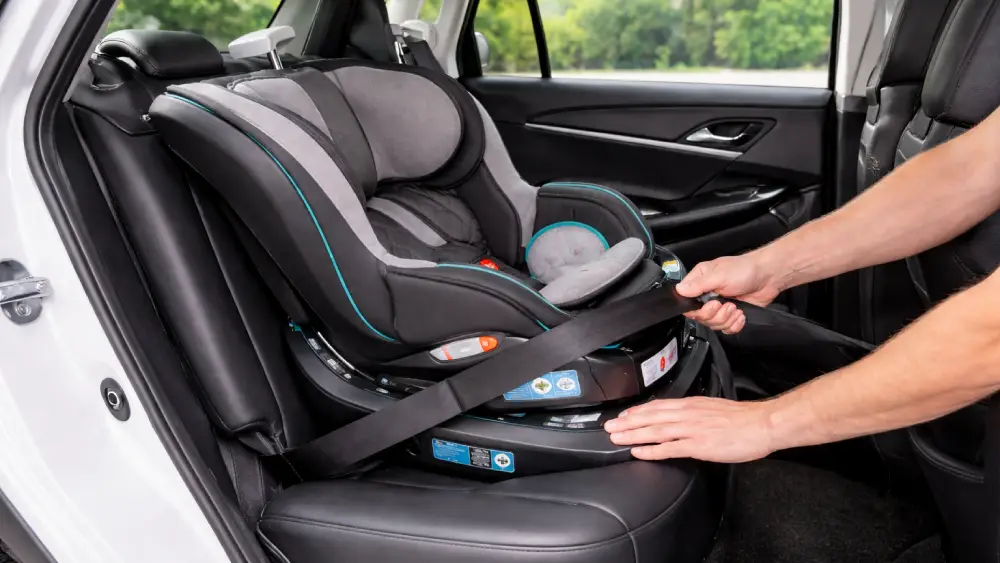
Step 3: Route the Seatbelt Through the Rear-Facing Belt Path
This is critical.
Thread both the lap and shoulder belt through the rear-facing belt path. It’s usually marked in blue or labeled clearly.
Important:
- No twists in the belt
- Belt fully inside the designated path
- Buckle not sitting awkwardly against the edge
Take your time here.
Step 4: Buckle the Seatbelt
Click it in firmly. Listen for the snap.
If the buckle stalk (the rigid part attached to your vehicle) is pushing into the belt path opening, you may need to slightly reposition the base.
Step 5: Lock the Seatbelt
Most modern vehicles use a switchable retractor.
To lock it:
- Pull the shoulder belt all the way out.
- Slowly feed it back in.
- You should hear clicking.
That clicking means it’s locked.
If your belt locks at the latchplate (near the buckle), it will stay tight once buckled. Confirm by gently pulling.
If it slides freely, it’s not locked.
Step 6: Tighten the Installation
Here’s where people struggle.
Put your knee or full body weight into the base directly over the belt path. Push down and back toward the seat crease.
At the same time:
- Pull the shoulder belt straight up to remove slack.
- Feed the belt back into the retractor while maintaining pressure.
Small adjustments make a big difference.
Step 7: Test for Tightness
Grab the base at the belt path only. Not the top. Not the rotating seat.
Push side-to-side and front-to-back.
Movement must be less than one inch.
If it moves more than that, repeat tightening.
Step 8: Attach the Rotating Seat
Click the seat onto the base.
Rotate it to confirm smooth motion. Then lock it into the rear-facing travel position.
Never drive with the seat rotated toward the door.
Rear-facing installation complete.
Step-by-Step: Forward-Facing Installation With Seatbelt
As your child grows, you’ll switch to forward-facing. The process is similar, but one step becomes non-negotiable: the tether.
Let’s review how to install Evenflo 360 car seat with seatbelt forward-facing.
Step 1: Switch Orientation
Adjust the seat to forward-facing mode. Confirm the recline position matches forward-facing requirements.
Different belt path. Different recline. Check carefully.
Step 2: Position the Base
Place the base flush against the seat back. Again, push it into the seat crease.
Confirm it sits flat.
Step 3: Route the Seatbelt Through the Forward-Facing Belt Path
The forward-facing belt path is separate from the rear-facing one. It’s typically marked in red.
Thread the belt cleanly through.
No twists. No crossing through the wrong channel.
Step 4: Buckle and Lock
Buckle the seatbelt.
Lock it using the same process described earlier:
- Pull shoulder belt fully out.
- Feed back in until clicking begins.
Verify it’s locked before tightening.
Step 5: Tighten Firmly
Apply body weight at the belt path.
Pull the shoulder belt tight.
Remove slack completely.
Check for less than one inch of movement at the belt path.
Step 6: Attach and Tighten the Top Tether
This step is essential.
The top tether reduces forward head movement in a crash. It significantly improves protection.
Locate your vehicle’s tether anchor. It may be:
- Behind the seat
- On the rear shelf
- In the cargo area (SUVs)
- On the ceiling (some vans)
Attach the tether hook.
Pull the strap until snug. Not overtightened. Just firm.
Never skip the tether in forward-facing mode unless explicitly prohibited.
Quick Installation Comparison
| Feature | Rear-Facing | Forward-Facing |
| Belt Path | Rear-facing path | Forward-facing path |
| Recline Required | Yes, must match angle indicator | Minimal recline |
| Top Tether | Not used | Required |
| Movement Test | <1 inch at belt path | <1 inch at belt path |
How to Confirm You Did It Right
Every installation should pass three tests:
- Angle Check (rear-facing only)
Indicator must be in approved range. - Tightness Check
Less than one inch of movement at belt path. - Locked Belt Check
Shoulder belt does not pull freely.
If you can pull the belt out without resistance, it’s not locked.
Simple. Repeatable. Effective.
Common Mistakes — And How to Fix Them
Even experienced parents make these.
1. Wrong belt path used
Fix: Double-check labeling before tightening.
2. Seatbelt not locked
Fix: Pull belt fully out to engage retractor.
3. Too much movement
Fix: Apply more downward pressure while tightening.
4. Skipping the tether forward-facing
Fix: Always attach and tighten tether.
5. Twisted seatbelt
Fix: Remove and reroute. Twists weaken belt performance.
6. Testing movement at the wrong spot
Fix: Only test at the belt path.
Small corrections. Big safety improvements.
Pro Tips for Easier Installation
A few things I’ve learned over time:
- Rotate the seat toward the door while tightening. It gives you better leverage.
- Tighten in stages. Don’t try to remove all slack in one pull.
- If the buckle stalk is too long, shift the base slightly sideways.
- Re-check tightness after driving a few days.
Learning how to install Evenflo 360 car seat with seatbelt becomes much easier once you’ve done it once or twice.
When to Get Professional Help
If you’re unsure, schedule a check with a Certified Passenger Safety Technician (CPST).
Many:
- Hospitals
- Police departments
- Community events
Offer inspections.
Peace of mind is worth the appointment.
Seatbelt vs. LATCH: Which Is Better?
Both are safe when used correctly.
Seatbelts:
- Have no weight limits for the child
- Work in every seating position with proper locking
- Are often required as your child grows
LATCH systems have weight limits that vary by seat and vehicle. Many parents eventually switch to seatbelt installations anyway.
That’s why understanding how to install Evenflo 360 car seat with seatbelt is so valuable long term.
Final Thoughts
Installing a car seat isn’t glamorous. It’s not exciting. But it’s one of the most important safety steps you’ll ever take for your child.
Slow down. Follow the belt path. Lock the belt. Tighten until movement is less than one inch. Use the tether when forward-facing.
Once you understand how to install Evenflo 360 car seat with seatbelt, the process becomes routine. Confident. Controlled.
And that confidence? It matters every time you drive.
Frequently Asked Questions
Pull the shoulder belt all the way out and let it retract; if you hear clicking and it won’t pull back out freely, it’s locked.
No, you should use either LATCH or the seatbelt unless the Evenflo manual specifically allows both (most do not).
It should move less than one inch side-to-side or front-to-back when tested at the belt path.
Yes, the top tether is required for forward-facing installation unless your vehicle manual states otherwise.
Yes, if your vehicle allows it and you can achieve a secure installation with a locking seatbelt.
Some movement at the top is normal; only test for tightness at the belt path.
Only if the manual permits it and you cannot achieve the correct recline angle without it.
Check tightness regularly, especially after long trips or if the seat has been adjusted.
Yes, when done correctly, learning how to install Evenflo 360 car seat with seatbelt provides the same level of safety as LATCH.
No, the seat must always be locked in the designated travel position while the vehicle is moving.