Installing a car seat should not feel like assembling a piece of furniture with missing instructions. And yet… here we are. If you’re searching for how to install a Joie 360 Spin car seat, you’re probably holding a seat, staring at your backseat, and thinking, “Why are there so many straps, clicks, and colored indicators?”
Good news. You’re not alone. Better news? Once you understand the logic of the Joie 360 Spin, installation becomes surprisingly straightforward. Not effortless. But absolutely manageable.
In this guide, I’m going to walk you through it step by step—rear-facing, forward-facing, ISOFIX, and seat belt installation—plus the checks that actually matter. We’ll keep it practical. No fluff. No guesswork.
Let’s do this.
Understanding the Joie 360 Spin Car Seat (Before You Install Anything)
The Joie 360 Spin is popular for one big reason.
It rotates.
That 360-degree spin isn’t a gimmick—it’s a sanity-saver, especially when you’re buckling a toddler who suddenly discovered the joy of arching their back like a gymnast.
But it’s also a seat with real safety engineering behind it. Which means you need to install it properly for it to work the way it’s designed.
Key Features You Should Know (Because They Affect Installation)
Here’s what matters when learning how to install a Joie 360 Spin car seat:
- ISOFIX connectors (for quick, secure attachment to your vehicle anchors)
- Support leg (also called a load leg or stability leg)
- Rear-facing and forward-facing modes
- Recline positions (critical for comfort and safety)
- Indicator colors (your best friend if you use them correctly)
- 360 rotation lock (so it doesn’t rotate freely while driving)
Rear-Facing vs Forward-Facing: The Practical Reality
Rear-facing is safer for longer. Full stop.
Even if your child looks “too big.” Even if Grandma insists you “turn them around already.” Rear-facing supports the head, neck, and spine better in a crash.
Most Joie 360 Spin models are designed to keep children rear-facing up to a higher weight than many parents expect.
Before You Begin: A Quick Setup Checklist (Do This First)
I know. You want to jump straight into clicking things into place.
But take five minutes here and you’ll save yourself twenty minutes later.
Step 1: Confirm Your Exact Model
There are several Joie rotating seats that look similar: Spin 360, i-Spin 360, i-Spin 360E, and others.
Installation steps are broadly similar. But not identical.
So before you start, check:
- The label on the side of the seat
- The manual that came with it
- Any sticker diagrams on the base
Step 2: Check Your Vehicle’s Backseat Setup
You want to identify:
- ISOFIX anchor points (usually between the seat cushion and seat back)
- Seat belt type (locking retractor vs latchplate)
- Any under-floor storage compartments (these can affect support leg use)
Step 3: Pick the Best Seating Position
Most professionals recommend the center rear seat when possible, but ISOFIX anchors often exist only on the two outer seats.
So your best practical choice is usually:
- Rear passenger side (easiest access from the curb)
- Or rear driver side (if that’s your preference)
Installing the Joie 360 Spin Using ISOFIX (Rear-Facing)
If your vehicle has ISOFIX (or LATCH, depending on your region), this is usually the cleanest and most reliable method.
And honestly? This is where the Joie 360 Spin shines.
Step 1: Place the Seat on the Vehicle Seat
Set the Joie 360 Spin on the vehicle seat and push it back so the base sits flush against the seat back.
Not floating. Not tilted. Flush.
If the seat is sitting crooked, fix it now. Crooked becomes loose later.
Step 2: Extend the ISOFIX Connectors
Most Joie models have ISOFIX connectors tucked into the base.
Pull them out until they extend far enough to reach your car’s anchors.
This part can feel stiff. That’s normal. It’s not broken. It’s just secure.
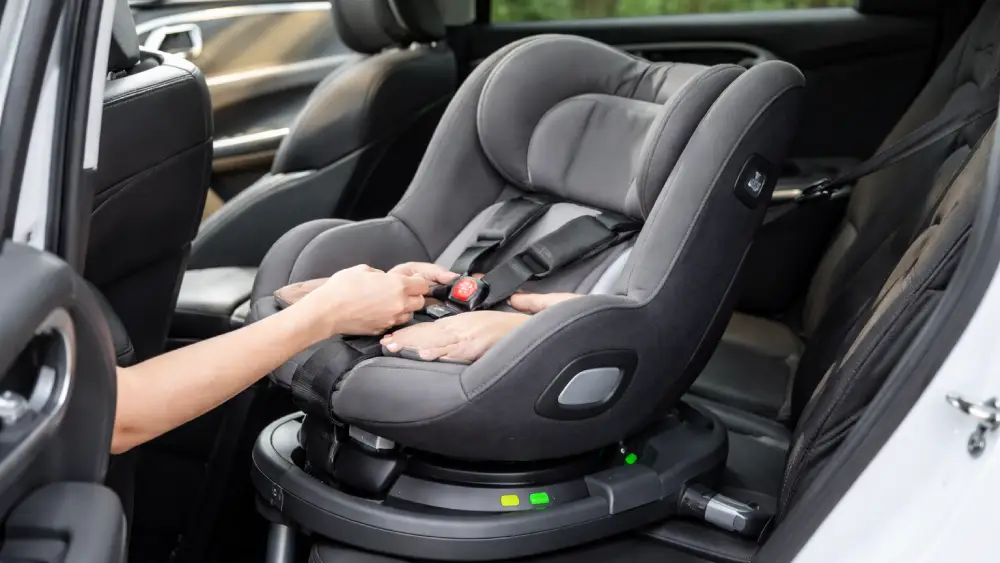
Step 3: Attach to the ISOFIX Anchors
Line the connectors up with the vehicle anchors and push until you hear the click.
Then check the indicators.
Most Joie bases show:
- Red = not secure
- Green = locked
You want green on both sides.
No green? Don’t pretend it’s fine. Unclip and redo it.
Step 4: Push the Base Back Tight
Once clicked in, press the base firmly toward the seat back.
This reduces slack and helps the seat sit properly.
Step 5: Deploy the Support Leg
This is the step people skip. And it’s a big deal.
Extend the support leg down to the vehicle floor until it makes solid contact.
Then check the support leg indicator.
It should also show green.
Important Support Leg Warning
If your vehicle has an under-floor storage compartment, you may not be allowed to rest the support leg on top of it.
Some vehicles allow it with a filler insert. Some don’t.
If you’re unsure, check your vehicle manual.
Step 6: Set the Correct Recline Angle
Rear-facing needs a proper recline angle.
Too upright and your child’s head can slump forward. Too reclined and the seat may not perform as intended.
Use the built-in recline indicator on the Joie 360 Spin. Adjust until it sits in the correct zone.
Step 7: Perform the “One-Inch Test”
Grab the seat at the belt path area and try to move it side to side and front to back.
If it moves more than 1 inch, it’s not tight enough.
This is the gold standard test. Not “it feels okay.”
ISOFIX Rear-Facing Installation: Quick Reference Table
Here’s a simple breakdown you can screenshot mentally.
| Step | What You Do | What You’re Checking |
| 1 | Place base flat | No tilt, no gap |
| 2 | Extend ISOFIX arms | Reach anchors cleanly |
| 3 | Click both sides in | Both indicators green |
| 4 | Push base back | Reduces slack |
| 5 | Extend support leg | Firm floor contact + green |
| 6 | Set recline | Angle indicator correct |
| 7 | One-inch test | Less than 1 inch movement |
Installing the Joie 360 Spin Using a Seat Belt (Rear-Facing)
Let’s be honest: seat belt installation is a little more work.
But it’s absolutely doable.
And sometimes it’s necessary—especially in older vehicles, taxis, travel situations, or center seats without ISOFIX.
If you’re learning how to install a Joie 360 Spin car seat without ISOFIX, this section is for you.
Step 1: Find the Correct Rear-Facing Belt Path
Joie seats typically have color-coded guides.
Rear-facing belt paths are often:
- Blue
- Or clearly labeled
Route the seat belt through the correct path.
Not around the outside. Not under random plastic. Through the guides.
Step 2: Buckle the Seat Belt
Buckle it fully.
Then pull the belt tight.
Step 3: Lock the Seat Belt
This is where many installations fail.
Your seat belt needs to lock so it stays tight.
Depending on your car, you may lock it by:
- Pulling the shoulder belt all the way out until it clicks into locking mode
- Or using a locking latchplate
Once locked, feed the belt back in while keeping tension.
Step 4: Compress the Base While Tightening
Put your weight into the base while pulling the belt tight.
I usually press down with one hand and pull with the other.
Not violently. Just firmly.
Step 5: Support Leg and Recline Still Apply
Even with seat belt installation, the support leg must be used if your model requires it.
Same for the recline indicator.
Step 6: One-Inch Test (Again)
Always.
Switching to Forward-Facing Mode (When the Time Comes)
This is the part parents look forward to.
Because once you turn the seat forward-facing, loading your child feels easier. It’s faster. Less bending. Less awkward twisting.
But don’t rush it.
When Should You Switch?
Follow your Joie manual for the exact limits, but generally:
- Switch only when your child exceeds the rear-facing limits
- And ideally when they’re older, stronger, and have better head/neck control
Rear-facing longer is not “extra.” It’s smart.
Step-by-Step: Forward-Facing with ISOFIX
Forward-facing ISOFIX installation is similar, but the seat position and belt path change.
- Rotate the seat to face forward
- Confirm ISOFIX connectors are clicked in (green indicators)
- Confirm support leg is properly deployed
- Adjust recline to a forward-facing approved position
- Do the one-inch test
Yes, still.
Always.
Step-by-Step: Forward-Facing with Seat Belt
If you’re not using ISOFIX, the seat belt will route through the forward-facing belt path (often red-coded).
Key actions:
- Route belt through the correct guides
- Lock the seat belt
- Remove slack
- Confirm stability
This is not the moment to “close enough” it.
How to Use the 360 Spin Feature the Right Way
The spin is the whole reason people buy this seat.
But it only works well when you treat it correctly.
Here’s How to Spin Safely
- Rotate the seat only when the car is parked
- Rotate it to load your child, then rotate back
- Confirm it clicks into the locked travel position before driving
If it’s not locked, don’t drive.
A Quick Reality Check
Sometimes the seat doesn’t rotate smoothly.
That’s usually because:
- The recline position is wrong
- The seat isn’t level
- The base is too tight against the vehicle seat in a way that blocks rotation
Small adjustments fix it.
Don’t force it.
Securing Your Child Properly (This Matters as Much as Installation)
A perfectly installed car seat with a poorly fitted harness is still a problem.
And it happens all the time.
Harness Height Rules (Simple and Important)
- Rear-facing: straps should come from at or below the shoulders
- Forward-facing: straps should come from at or above the shoulders
The Pinch Test
After buckling, try to pinch the harness strap at the collarbone.
If you can pinch a fold of webbing, it’s too loose.
If you can’t pinch it, it’s snug enough.
Chest Clip Placement
The chest clip should sit at armpit level.
Not on the belly. Not near the neck.
Armpit level.
Every time.
Common Mistakes (And How to Avoid Them)
This is the section that saves people.
Because most car seat problems come from a handful of repeat mistakes.
The Most Common Installation Mistakes
- Not locking the seat belt during belt installation
- Ignoring red indicators on ISOFIX connectors
- Support leg not touching the floor (or sitting incorrectly)
- Recline angle wrong for rear-facing
- Seat moves more than 1 inch at the belt path
- Harness too loose even though the seat is installed correctly
- Seat not fully locked in travel position after rotating
If you avoid these, you’re already ahead of most installations.
Quick Safety Check: The 60-Second Routine I Recommend
Before you drive, do this quick scan.
60-Second Checklist
- ISOFIX indicators are green (if using ISOFIX)
- Support leg indicator is green
- Seat doesn’t move more than 1 inch
- Recline indicator is in the correct zone
- Harness passes pinch test
- Chest clip is at armpit level
- Seat is locked into travel position (not mid-spin)
It sounds like a lot.
But it becomes automatic fast.
Final Thoughts: Installing It Right Is a One-Time Skill
Learning how to install a Joie 360 Spin car seat can feel intimidating the first time.
I get it. I’ve been there. It’s one of those tasks where you want a “perfect” result, because the stakes are high and the passenger is small.
But here’s the truth.
Once you install it correctly once, you’ll understand it. And from there, it becomes routine. Quick. Almost boring.
And boring is good.
So take your time. Follow the indicators. Trust the one-inch test. Use the support leg properly. Lock the seat belt if that’s your method. And always double-check that the seat is locked in the travel position before you pull away.
Because a rotating seat is wonderful.
A properly installed rotating seat is peace of mind.
And that’s the whole point.
Frequently Asked Questions
Yes—most models allow seat belt installation, as long as you route and lock the belt correctly.
It should move less than 1 inch at the belt path when you tug it side to side.
Yes, if your model includes a support leg, it’s part of the safety design and should always be used.
This usually happens when the recline position is wrong or the seat isn’t fully locked into the base.
It’s not recommended, but if you must, your vehicle must allow it and the airbag must be disabled.
Switch only when your child exceeds the rear-facing limits listed in the Joie manual.
Usually no—most Joie models require you to use one installation method, not both.
You may need a filler insert or a different seating position, depending on your vehicle’s rules.
Check the indicators—proper installation should show green on both connectors.
Re-check it every few weeks and anytime the seat is removed, adjusted, or moved to another vehicle.