Installing a car seat isn’t something I ever want to rush. When I first looked up how to install a Joie 360 car seat, I realized how much confidence comes from truly understanding each step—not just clicking things into place and hoping for the best. This guide walks you through the process carefully, clearly, and without fluff, so you know your child is protected every time you drive.
The Joie 360 is popular for good reason. It rotates smoothly, supports extended rear-facing, and uses ISOFIX for added stability. But those benefits only matter if installation is done right. Let’s get into it.
Getting to Know the Joie 360 Car Seat
Before touching your car, it helps to understand what you’re working with.
The Joie 360 is a rotating ISOFIX car seat designed for both rear-facing and forward-facing use. The rotation function makes it easier to load and unload your child, especially in tight parking spaces. It also encourages longer rear-facing use, which is significantly safer.
Key things to know:
- Designed for newborns up to approximately 4 years (model dependent)
- Rear-facing is recommended for as long as possible
- Uses ISOFIX connectors and a support leg (not a top tether)
Knowing these basics makes the rest of the process far less intimidating.
Before You Install: Safety and Preparation
I always start with preparation. It saves time and prevents frustration.
First, check your vehicle. Most modern cars have ISOFIX anchor points, but not every seat position does. Look for small ISOFIX labels or consult your vehicle manual.
Next, skim the Joie manual—not every page, just the installation diagrams and safety warnings. They matter more than you think.
You’ll also want:
- Enough space to fully open your car door
- Good lighting
- A few uninterrupted minutes
No tools required. That’s a win already.
Understanding ISOFIX and the Support Leg
ISOFIX is a standardized system that connects the car seat directly to your vehicle’s frame. It reduces installation errors dramatically.
The Joie 360 uses:
- Two ISOFIX connectors that click into your car’s anchor points
- One support leg that extends to the vehicle floor for extra stability
The support leg is critical. If it’s not adjusted correctly, the seat won’t perform as designed in a crash.
A common mistake? Letting the leg hover or sit at an angle. It must rest firmly on the floor.
Switching to Forward-Facing Mode
Forward-facing installation uses the same base, which is convenient. Still, it’s not something I recommend doing early.
Only switch when your child exceeds the rear-facing limits. Rear-facing offers better neck and spine protection—no debate there.
To switch:
- Rotate the seat to face forward
- Ensure the seat locks firmly into position
- Recheck ISOFIX and support leg indicators
Never assume it’s still secure just because it was before. Always recheck.
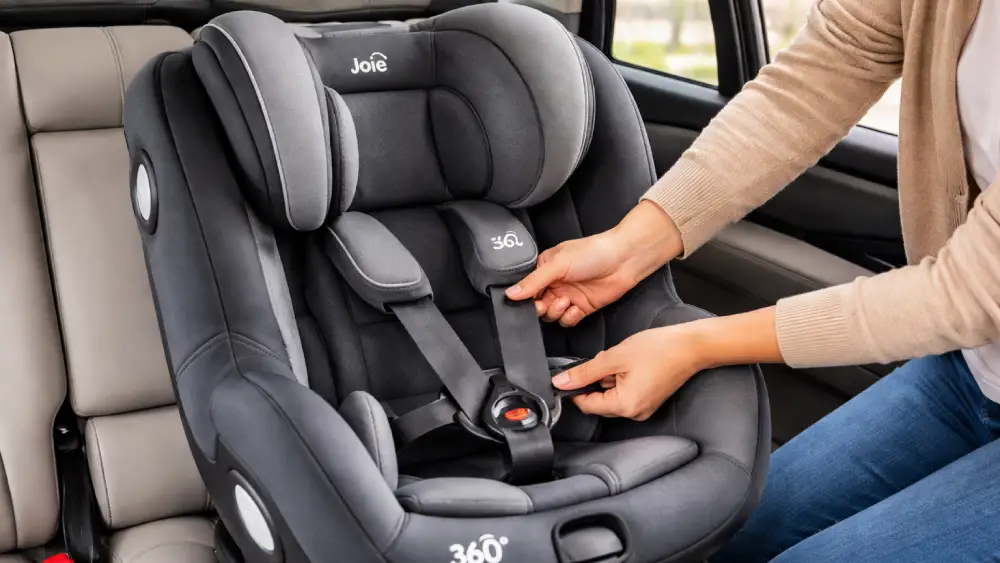
Securing Your Child Correctly
Installation doesn’t stop with the seat itself. A poorly fitted harness can undo all your good work.
I follow three rules:
- Harness straps at or below shoulders for rear-facing
- No slack—pinch test should fail
- Chest clip (if applicable) positioned correctly
The Joie 360 headrest and harness adjust together, which makes this easier. Use it. Adjust as your child grows.
Common Installation Errors (and Fixes)
Even when people know how to install a Joie 360 car seat, I see a few mistakes come up repeatedly.
- Loose ISOFIX connection
Fix: Remove and reattach until both indicators show green. - Incorrect support leg length
Fix: Extend until firmly planted, not floating. - Twisted harness straps
Fix: Untwist fully—twists reduce crash performance.
Catching these early makes a big difference.
Quick Safety Checklist
| Checkpoint | What to Look For |
| ISOFIX indicators | Green on both sides |
| Support leg | Firm on floor, green indicator |
| Seat movement | Less than 1 inch at base |
| Harness fit | Snug, flat, properly aligned |
I run through this checklist every few weeks. It takes less than a minute.
Frequently Asked Questions
Can you reinstall the Joie 360 in another car?
Yes, as long as the vehicle has ISOFIX and a compatible floor for the support leg.
Is it normal for the seat to rotate stiffly at first?
Yes. It loosens slightly with use.
Do I need to reinstall after cleaning?
If the base stays in place, no—but always recheck indicators.
These questions come up often when people revisit how to install a Joie 360 car seat after a few months.
Final Thoughts
Learning how to install a Joie 360 car seat properly is one of those skills that pays off every single day. Once you’ve done it a couple of times, the process feels natural. More importantly, it feels secure.
I always tell parents this: confidence comes from clarity. If you understand why each step matters, you’re far less likely to miss something important.
Take your time. Double-check. And trust that you’ve done the work to keep your child safe—because you have.
Frequently Asked Questions
Most children can remain rear-facing until around 4 years old, depending on height and weight limits for your specific model.
Yes, the Joie 360 is designed specifically for ISOFIX installation and cannot be installed using a seat belt.
Yes, the support leg is a critical safety feature and must be correctly adjusted to rest firmly on the vehicle floor.
It’s not recommended unless the airbag is fully disabled and your vehicle manual confirms compatibility.
All safety indicators should show green, and the seat should have minimal movement at the base.
No, the seat should only be rotated when the vehicle is parked and stationary.
No, but you should regularly adjust the harness and headrest to maintain a proper fit.
Yes, some resistance is normal, especially when the seat is new or properly locked.
Yes, as long as each vehicle has ISOFIX anchor points and a compatible floor for the support leg.
Yes, Joie recommends replacing the car seat after any moderate or severe collision.