If you’re wondering how to adjust Joie 360 car seat properly, you’re not alone. I’ve walked many parents through this process, and once you understand how each feature works, it becomes surprisingly straightforward. The Joie 360 is designed to grow with your child and make daily life easier thanks to its rotating base—but it only delivers full safety and comfort when adjusted correctly.
In this guide, I’ll walk you step by step through everything you need to know: harness tightening, headrest positioning, recline settings, rotation locking, ISOFIX adjustments, and how to adapt the seat as your child grows. Let’s get it set up the right way.
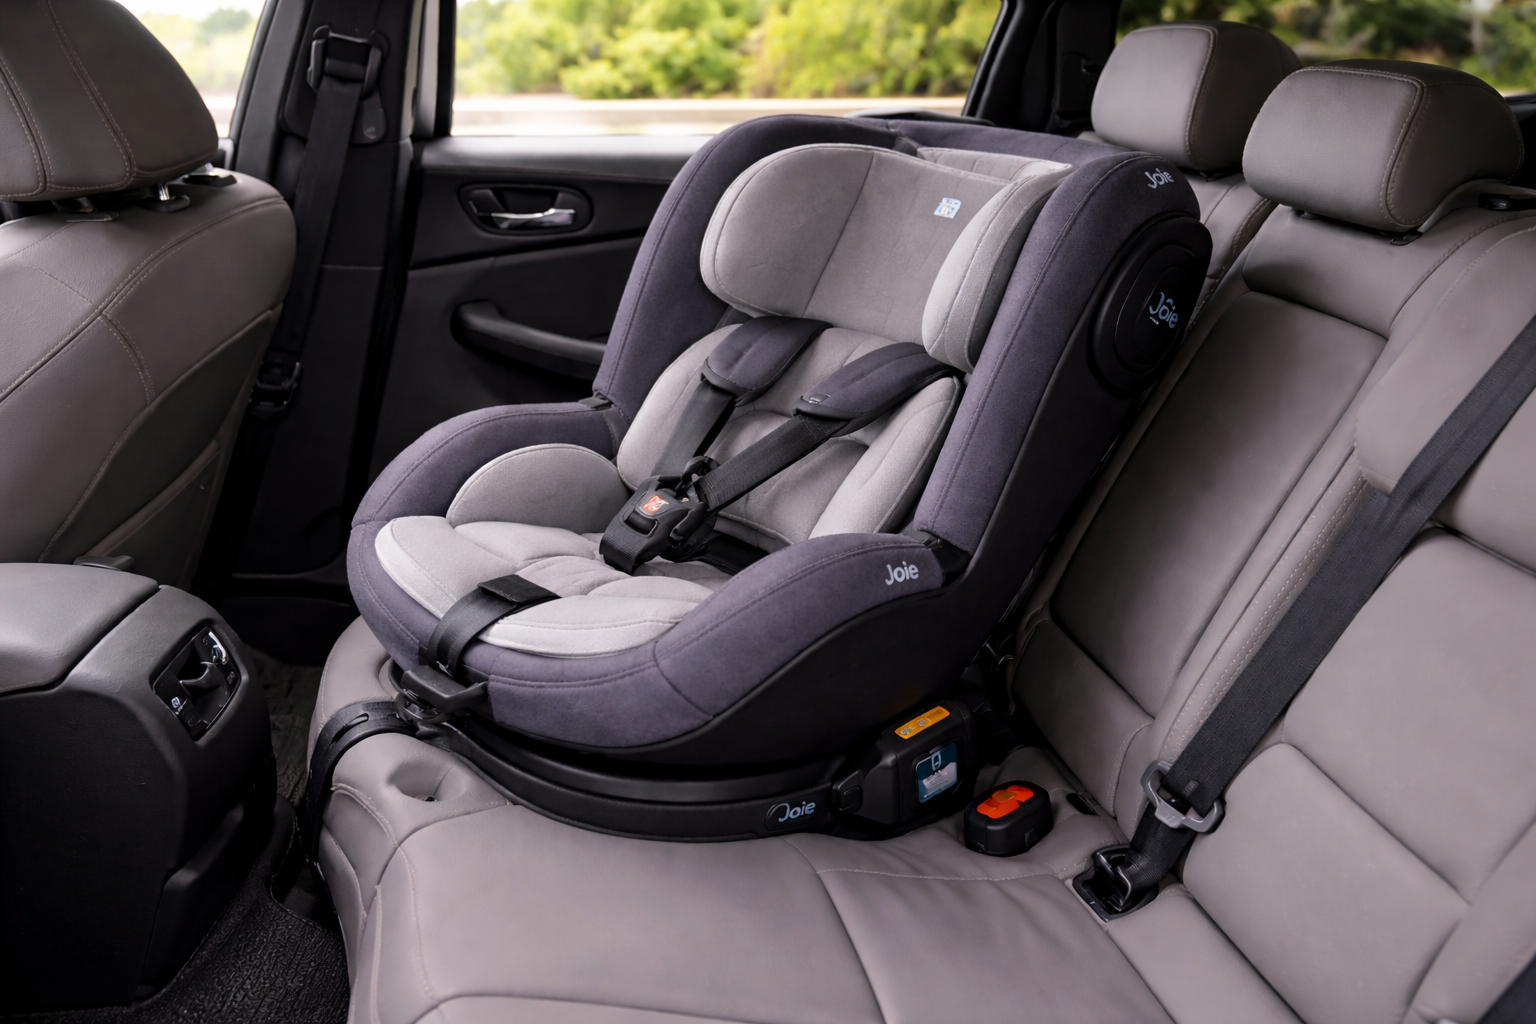
Understanding the Joie 360 Car Seat Features
Before diving into adjustments, it helps to understand what you’re working with.
The Joie 360 typically includes:
- A 360° rotating seat base
- A 5-point harness system
- Adjustable headrest (often integrated with harness height)
- Multiple recline positions
- ISOFIX connectors
- A support leg for added stability
Each of these parts plays a role in keeping your child safe.
The biggest mistake I see? Parents adjust one element but overlook another. For example, raising the headrest without tightening the harness, or reclining the seat without checking the level indicator. When learning how to adjust Joie 360 car seat, think of it as a system—every component works together.
How to Adjust the Harness on a Joie 360 Car Seat
The harness is the most critical safety element. If it’s too loose, your child isn’t properly restrained. If it’s too tight or twisted, it can cause discomfort and improper positioning.
Step 1: Loosen the Harness
Start by locating the harness adjustment button. It’s usually hidden under a small flap at the front of the seat.
- Press the adjustment button.
- Pull the shoulder straps forward to loosen them.
Make sure the straps move smoothly. If they don’t, check for twists behind the seat.
Step 2: Position Your Child Properly
Before tightening anything, ensure your child is sitting correctly:
- Back flat against the seat
- Hips fully back
- No bulky coats or padding under the harness
A child slouching forward will make the harness feel tight at first—but once they sit upright, it becomes loose.
Step 3: Tighten the Harness
Now pull the front adjustment strap until snug.
Here’s the golden rule: perform the pinch test.
Try to pinch the harness at your child’s shoulder. If you can grab extra material, it’s too loose. If your fingers slide off without gripping fabric, it’s correct.
Harness Height Guidelines
| Seating Direction | Harness Position |
| Rear-Facing | At or just below shoulders |
| Forward-Facing | At or just above shoulders |
Getting this right is essential when learning how to adjust Joie 360 car seat safely.
How to Adjust the Headrest Height
The Joie 360 usually features a one-hand adjustable headrest system. The harness and headrest move together in most models, which simplifies the process.
How to Raise or Lower the Headrest
- Locate the adjustment lever at the back or top of the headrest.
- Squeeze or lift the lever.
- Slide the headrest up or down.
- Release and ensure it clicks into place.
It should lock firmly. Give it a gentle tug to confirm.
Proper Headrest Position
- The straps align correctly with your child’s shoulders.
- The head is supported without pushing the chin forward.
- The top of the ears should not exceed the seat shell.
If you’re researching how to adjust Joie 360 car seat for a growing toddler, this is the adjustment you’ll likely make most often.
How to Adjust Recline Positions
Recline affects both comfort and airway safety—especially for infants.
Finding the Recline Handle
Look near the front base of the seat. There’s typically a lever or handle that controls recline settings.
Adjusting the Recline
- Pull the recline handle.
- Gently shift the seat into the desired angle.
- Release the handle and confirm it locks.
Never force it. If it doesn’t move easily, double-check installation.
Choosing the Correct Recline
- Infants (rear-facing): More reclined to keep airway open.
- Older rear-facing toddlers: Slightly more upright.
- Forward-facing: More upright position.
Many Joie models include a level indicator. Always check that the bubble or line falls within the correct zone.
Improper recline is one of the most common errors I see when teaching parents how to adjust Joie 360 car seat.
How to Use and Lock the 360° Rotation Feature
The rotating function is what makes this seat so convenient. No more awkward twisting while lifting your child!
Unlocking the Rotation
- Locate the rotation button near the base.
- Press and hold it.
- Rotate the seat toward the door.
It should move smoothly.
Locking the Seat in Position
Rotate the seat back into either rear-facing or forward-facing position until you hear a clear click.
Important:
Never drive with the seat facing sideways. Always confirm:
- The seat clicks into place.
- It does not swivel freely.
- Indicator shows locked position (if included).
If the seat won’t rotate, check:
- Is it reclined correctly?
- Is ISOFIX fully engaged?
- Is the support leg firmly installed?
When mastering how to adjust Joie 360 car seat, understanding the rotation lock is critical for safety.
Adjusting ISOFIX and Support Leg
Proper installation makes every other adjustment meaningful.
Extending ISOFIX Connectors
- Press the ISOFIX release button.
- Pull the connectors outward.
- Push into your vehicle’s anchor points until you hear a click.
- Check the indicator (usually green when secure).
The base should not shift more than one inch side-to-side.
Adjusting the Support Leg
- Extend the leg downward.
- Adjust until it firmly touches the vehicle floor.
- Confirm the indicator shows correct contact.
The support leg must sit flat—not angled or hovering.
Common Installation Mistakes
- Support leg not fully touching floor
- ISOFIX connectors partially engaged
- Incorrect recline before locking installation
- Ignoring indicator colors
If the seat feels loose, revisit installation before adjusting anything else. You cannot properly learn how to adjust Joie 360 car seat without ensuring it’s installed securely first.
Adjusting as Your Child Grows
Children grow fast. One month everything fits perfectly—next month it feels cramped.
Here’s how to stay ahead.
When to Raise the Headrest
- Shoulders reach the upper harness level.
- Straps begin angling downward incorrectly.
- Head approaches the top of the seat shell.
Removing Infant Inserts
Most Joie 360 models include removable padding for smaller babies. Remove inserts gradually according to:
- Weight guidelines
- Fit (snug but not squished)
- Manufacturer instructions
Never remove structural padding that’s required for safety.
Rear-Facing vs Forward-Facing Adjustments
Rear-facing is significantly safer for as long as possible. Check your specific model’s:
- Weight limits
- Height limits
- Minimum forward-facing requirements
When switching directions, you’ll likely need to:
- Re-adjust harness height
- Change recline setting
- Confirm rotation lock alignment
Knowing how to adjust Joie 360 car seat during transitions ensures you maintain safety through each stage.
Troubleshooting Common Adjustment Issues
Even with clear instructions, small issues can pop up.
Harness Won’t Tighten
Check for:
- Twisted straps behind the seat
- Debris in adjustment mechanism
- Child leaning forward
- Insert padding blocking strap movement
Seat Won’t Rotate
Common causes:
- Seat not reclined properly
- Installation too tight against vehicle seat
- Support leg not correctly adjusted
Seat Feels Loose
Recheck:
- ISOFIX engagement
- Indicator colors
- Support leg contact
- Vehicle seat angle
When parents ask me how to adjust Joie 360 car seat because it “feels wrong,” it’s often an installation issue—not a harness problem.
Quick Adjustment Checklist
Here’s a simple reference you can revisit anytime:
- Harness snug (passes pinch test)
- Straps positioned correctly for direction
- Headrest aligned with shoulders
- Recline within safe indicator range
- Seat locked in rear- or forward-facing position
- ISOFIX fully engaged
- Support leg firmly touching floor
Run through this checklist monthly—or anytime your child has a growth spurt!
Safety Tips and Final Checks
Even after learning how to adjust Joie 360 car seat, safety is an ongoing habit.
I recommend:
- Checking harness tightness every ride.
- Re-inspecting installation every few weeks.
- Avoiding aftermarket accessories.
- Removing bulky coats before buckling.
- Reviewing your manual for model-specific instructions.
If you’re ever unsure, consider having your installation inspected by a certified child passenger safety technician. A second set of trained eyes can provide peace of mind.
Final Thoughts
Learning how to adjust the Joie 360 car seat might feel overwhelming at first, but once you break it down—harness, headrest, recline, rotation, installation—it becomes manageable. The key is taking a few extra minutes to double-check each component and making small adjustments as your child grows.
The Joie 360 is designed to make parenting easier. When properly adjusted, it offers convenience, comfort, and strong protection—all in one thoughtful system.
Take your time. Follow the steps carefully. And don’t hesitate to recheck your setup regularly. Your child’s safety is worth it—every single ride!
Frequently Asked Questions
Use the pinch test—if you can’t pinch excess strap at your child’s shoulder, it’s snug enough.
Raise it when your child’s shoulders reach the current strap level or the straps no longer align properly.
No, the seat must always be locked in rear- or forward-facing position before driving.
Newborns need a more reclined position to keep their airway open and supported.
It may not rotate if the recline isn’t set correctly or if the ISOFIX and support leg aren’t properly installed.
Only switch once your child meets the minimum height and weight limits in your manual, though rear-facing longer is safer.
Yes, remove inserts gradually according to the manufacturer’s weight and fit guidelines.
Check installation every few weeks and after any long trip or seat adjustment.
Loosen the harness fully and untwist the straps behind the seat before tightening again.
Not at all—once you understand each component, adjusting it becomes quick and routine.