If you’ve been Googling Joie 360 car seats to remove inserts, you’re in good company. This is one of those parenting questions that sounds simple… until you’re staring at a pile of padding pieces thinking, Wait—are these safety parts or just comfort parts?
And the truth is: they’re both. Kind of.
Joie inserts are designed to help smaller babies fit the seat properly, sit in a safer position, and keep the harness aligned the way it’s meant to be. But as your baby grows, those same inserts can start doing the opposite—pushing the baby forward, crowding the harness, and creating a fit that looks “snug” but isn’t actually correct.
So in this guide, I’m going to walk you through exactly how to decide when to remove each insert, what signs matter most, what mistakes to avoid, and how to do it without turning your harness into a twisted mess.
Let’s make this easy. And let’s make it accurate.
What Inserts Are on a Joie 360 Car Seat?
First, we need to get very clear on what we’re talking about.
Most Joie 360 seats (including Spin 360 and i-Spin 360 versions) come with a few removable padded pieces. Depending on your model, you may have:
- Newborn insert (the thick, cushy base pad)
- Body support insert (fills space around the torso)
- Head support insert (supports the head and neck area)
- Wedge-style pad (only on some versions)
- Shoulder strap pads (these are usually separate from the “insert system”)
Here’s the key: inserts are not random accessories. They are there to help a smaller baby fit the seat safely.
But they’re also meant to be temporary.
And yes, the confusion is normal—because Joie seats often include multi-piece inserts, and parents aren’t always told clearly that you’re supposed to remove them in stages.
Why Insert Removal Matters (More Than Most Parents Realize)
This part surprises people.
When inserts stay in too long, they can affect more than comfort. They can affect:
- Harness fit
- Shoulder strap positioning
- Baby’s head position
- How the baby’s hips sit
- Whether the baby is pushed forward in the seat
That’s not a small thing.
A seat can look “nice and snug” while actually holding the baby in a slightly awkward posture. And awkward posture can lead to slumping, chin-to-chest positioning, or harness straps that don’t sit as flat as they should.
On the other hand, removing inserts too early can create its own problems.
You may suddenly notice:
- side-to-side wobble
- baby leaning
- the harness looking too loose
- the baby appearing “too small” in the seat
So the goal isn’t to remove inserts as fast as possible.
The goal is to remove them at the right time.
General Joie 360 Insert Removal Guidelines (What Most Parents Need)
Now for the real-world answer.
In most Joie 360 seats, inserts are meant to come out in stages.
Not all at once. Not in one day. And definitely not because your baby “looks big.”
Here’s the most common pattern:
- Remove the lower newborn insert first
- Keep the head support longer
- Remove the body support when baby looks cramped
- Remove the head insert last, when it starts crowding
Let’s break it down.
Body Support Insert: When to Remove It
The body support insert usually fills space around the torso.
It’s meant to help a smaller baby stay centered and stable, especially in the early months. But like the newborn insert, it can eventually create crowding.
Remove the body support insert when:
- your baby’s torso looks compressed
- the harness rubs the neck because padding pushes the straps inward
- the baby looks uncomfortable around the ribs or hips
Some parents remove the body support at the same time as the newborn insert.
Others keep it longer.
Both can be correct. It depends on your baby’s build.
Head Support Insert: When to Remove It
This is the one parents often keep the longest.
And honestly? That’s usually the right call.
Head support is useful for:
- reducing side-to-side head movement
- improving comfort during naps
- keeping the head centered
But it should never push the head forward.
Remove the head insert when:
- your baby’s head is being nudged forward unnaturally
- the opening feels too tight
- the baby’s head no longer rests naturally back
This is a big deal.
A baby’s head should rest naturally. Not be propped forward by padding.
Fit Check: How to Tell Your Baby Has Outgrown the Inserts
This is where we stop guessing and start checking.
Here’s a practical, repeatable way to answer joie 360 car seat when to remove inserts without overthinking.
Step 1: Buckle your baby in as normal
Use the inserts you currently have in place.
Tighten the harness.
Step 2: Check harness position at the shoulders
For rear-facing, straps should come from at or below the shoulders.
Now look for:
- straps sitting on top of thick padding
- straps forced outward by inserts
- straps not lying flat
Step 3: Check the baby’s posture
Ask yourself:
- Is the baby sitting naturally back into the seat?
- Or does the baby look pushed forward?
- Are the hips tucked in properly?
- Does the spine look supported?
Step 4: Check head position
This is the simplest and most valuable check.
If the inserts push the baby’s head forward, it’s time to adjust.
Quick Table: Insert Removal Signals You Can Actually Use
Here’s a simple cheat sheet you can come back to.
| Insert Type | Keep It If… | Remove It If… |
| Newborn insert | Baby still needs lift and extra snugness | Baby looks perched, cramped, or pushed forward |
| Body support | Baby leans without it | Baby looks squeezed or straps rub neck |
| Head support | Head wobbles or tilts without it | Head is pushed forward or opening is too tight |
Clean. Practical. No fluff.
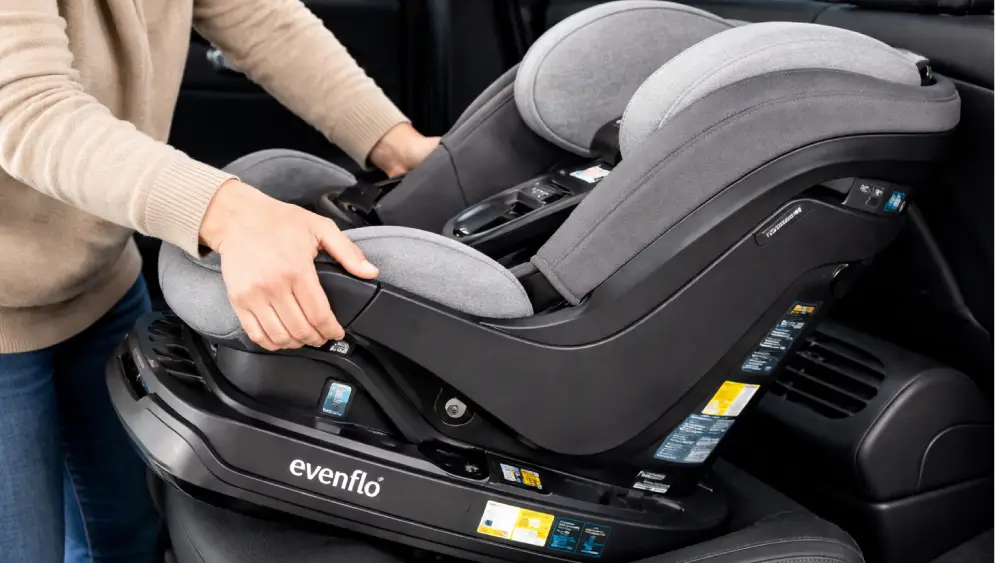
Step-by-Step: How to Remove Joie 360 Inserts Correctly
This is where a lot of people accidentally create new problems.
Because inserts often thread through the harness slots, and it’s easy to twist the straps or mis-route the cover.
Here’s how to do it without drama.
1) Loosen the harness fully
Give yourself space. Don’t try to do this while the harness is tight.
2) Unbuckle and move the straps out of the way
If the insert is threaded through, gently slide it out.
3) Remove one insert at a time
Start with the lower newborn insert first.
This makes it easier to evaluate the change.
4) Check the harness for twists
Before you put your baby back in, do a quick strap scan:
- flat straps
- no twists
- no bunching
- no cover trapped in the harness path
5) Reinstall the cover properly
Yes, it matters.
A cover that isn’t seated correctly can cause the harness to sit oddly or tighten unevenly.
Common Mistakes Parents Make (And How to Avoid Them)
This is where you can save yourself a lot of stress.
Mistake 1: Removing inserts too early because the baby “looks big”
Some babies are long but still narrow.
Fit is not about appearance. It’s about positioning.
Mistake 2: Keeping inserts too long because the baby “looks comfortable”
A baby can look cozy while being slightly pushed forward.
Comfort doesn’t equal correct fit.
Mistake 3: Using third-party inserts
I’ll say it plainly: don’t.
Aftermarket inserts aren’t crash-tested with your Joie seat. They can interfere with harness fit and performance.
Mistake 4: Forgetting to re-check harness tightness after removal
Removing padding changes the way the harness tightens.
Always do a full re-check.
Mistake 5: Removing head support first
Most babies outgrow the lower insert first.
Head support often remains helpful longer.
Special Cases: Preemies, Small Babies, and Chunky Babies
Not all babies follow the “average” pattern.
Because babies love being individuals.
Premature babies or very small newborns
These babies may need inserts longer.
The priority here is proper harness fit and stable posture. If you’re unsure, it’s worth getting a professional fit check.
Long, lean babies
These babies often outgrow the lower insert early.
They may still benefit from head support.
Chunky babies
Chunky babies may outgrow inserts earlier due to width.
If the shoulders look compressed or the harness is being pushed outward, remove the lower insert first.
Troubleshooting After Insert Removal (The “Oh No” Moments)
This is the part parents don’t expect.
You remove an insert. Everything looks different. And you think you broke something.
You probably didn’t.
Here are the most common issues and what they usually mean.
Baby slumps sideways
Try:
- keeping the head insert longer
- double-checking the recline indicator
- making sure baby isn’t wearing slippery clothing
Baby’s head falls forward
Try:
- adjusting recline
- re-checking that the baby is sitting fully back
- reconsidering whether the head support insert should stay in a bit longer
Harness suddenly feels looser
This is normal after removing padding.
Just tighten again and check for:
- slack
- strap twists
- cover interference
Baby looks “smaller” in the seat
Also normal.
Removing inserts removes bulk. That’s the point.
Final Thoughts: The Insert Goal Is Fit, Not Fluff
Let’s land this cleanly.
If you’re trying to answer the joie 360 car seat when removing inserts, don’t chase the perfect age. Don’t chase the perfect weight. Don’t chase what another parent posted online.
Chase fit.
Remove inserts when they start to crowd your baby, push posture forward, or interfere with the harness lying flat. Do it in stages. Make one change at a time. Re-check the harness every time. And always follow your Joie manual when it gives specific limits.
You’re not overthinking. You’re being careful.
And in car seat safety, careful is the whole game.
Frequently Asked Questions
Yes, as long as your baby fits correctly without it and your manual allows it.
Many outgrow the lower insert around 3–6 months, but fit matters more than age.
Usually no. Head support often stays longer.
It can be, because extra padding can affect harness positioning and posture.
They may need a recline adjustment, or you may have removed too much padding at once.
Usually yes—follow your manual’s care instructions.
Avoid third-party inserts. Contact Joie for official replacements.
Often yes, depending on model and region.
No. It’s not recommended and can interfere with safety performance.
Rear-facing straps should be at or below shoulders, snug, and lying flat with no slack.